Chapter 4: Scraping Your Own Facebook Data
Social media is becoming a digital vault for our lives and our memories; its servers store a history of our behavior that allows us to remember important events with incredible precision. A number of social media platforms allow us to download archives of our social media history as data files or HTML web pages. These archives may contain posts from our Facebook timelines, messages we send to each other, or every tweet we’ve ever posted.
In this chapter, you’ll learn how to use Python to get data from our downloadable Facebook archives using an automated scraper. The scraper goes through each HTML element that contains the information we want to collect, extracts this information, structures it in rows, and then writes every row of data into a list or spreadsheet, just like we did when we wrote an API in Chapter 3. But this time we’ll use a slightly different method to populate our spreadsheet: we’ll be using a data dictionary to structure our data before we write it to a .csv file. This is a very helpful and widely adopted way to organize data, and it will expand your knowledge of the csv library we used in the previous chapter.
Your Data Sources
From the day you register an account, most (if not all) social media companies start storing data about you. You can see some of this data by scrolling backward on your Facebook and Twitter timelines or your Instagram feed.
Although most platforms allow users to download a lot of their personal data, it is often unclear how complete these data archives are. Social media companies determine how much and what kind of data they want to release to their users, just like they determine how much data they want to release publicly through an API. And on top of that, it can be a little tricky to figure out how to download your own data archive: options can be buried in the fine print of our user settings, and are not often visually distinguished.
Access to data archives varies from platform to platform and can be almost shockingly granular or similarly sparse. In May of 2018 the European Union’s General Data Protection Regulation (GDPR) went into effect, requiring companies across the world to protect the privacy of their users, in part by giving them more control over their own data. While the laws were introduced to largely benefit users in the European Union, many social media companies have created easier pathways for anyone, in Europe or not, to download and view their own data.
In this chapter, we’ll only tap into the data that’s publicly available in downloadable social media archives. You’ll learn about web scraping, the process of gathering and storing data from the web. Every website presents its own unique data challenges. For the purposes of this tutorial, we’ll be looking at how to scrape data from Facebook, which is one of the most popular global platforms and offers various formats for us to analyze. If you do not have a Facebook account, you can find a sample file to scrape here: https://github.com/lamthuyvo/social-media-data-book.
Downloading Your Facebook Data
First we need to download our data. Many social media sites contain the instructions for downloading your archive, but they may be buried deep within the site. An easy way to find your archive is by entering this formula into your search engine of choice: platform/language + verb + object. For example, to find your Facebook archive, you’d search “Facebook download archive” or “Python scrape Facebook archive.”
To download your Facebook archive, follow these steps:
- Click the down arrow at the top right of any Facebook page and select Settings.
- On the sidebar at the left, click Your Facebook Information below your General account settings.
- Navigate to Download Your Information and click View.
This should open a new page with an option to create a file containing your archive. Keep the default settings (Date Range: All of my data; Format: HTML; and Media Quality: Medium). Click Create File.
Next, you should be prompted to enter your account credentials (confirming your password), and then Facebook should email you the link to a downloadable file.
The archive should download as a ZIP file. Place this file inside the folder you’ll use for all the files related to this project. Unzip the downloaded file, and you should see multiple files and folders in a folder titled facebook-<yourname>. In my case, this folder is called facebook-lamthuyvo.
Double-click the file titled index.html, and your default browser should open the page. In your browser, you should see categories for the information you downloaded (ads, messages, friends, and so on) on the left side of the menu and an overview of your account information on the right side, as shown in Figure 4-1.
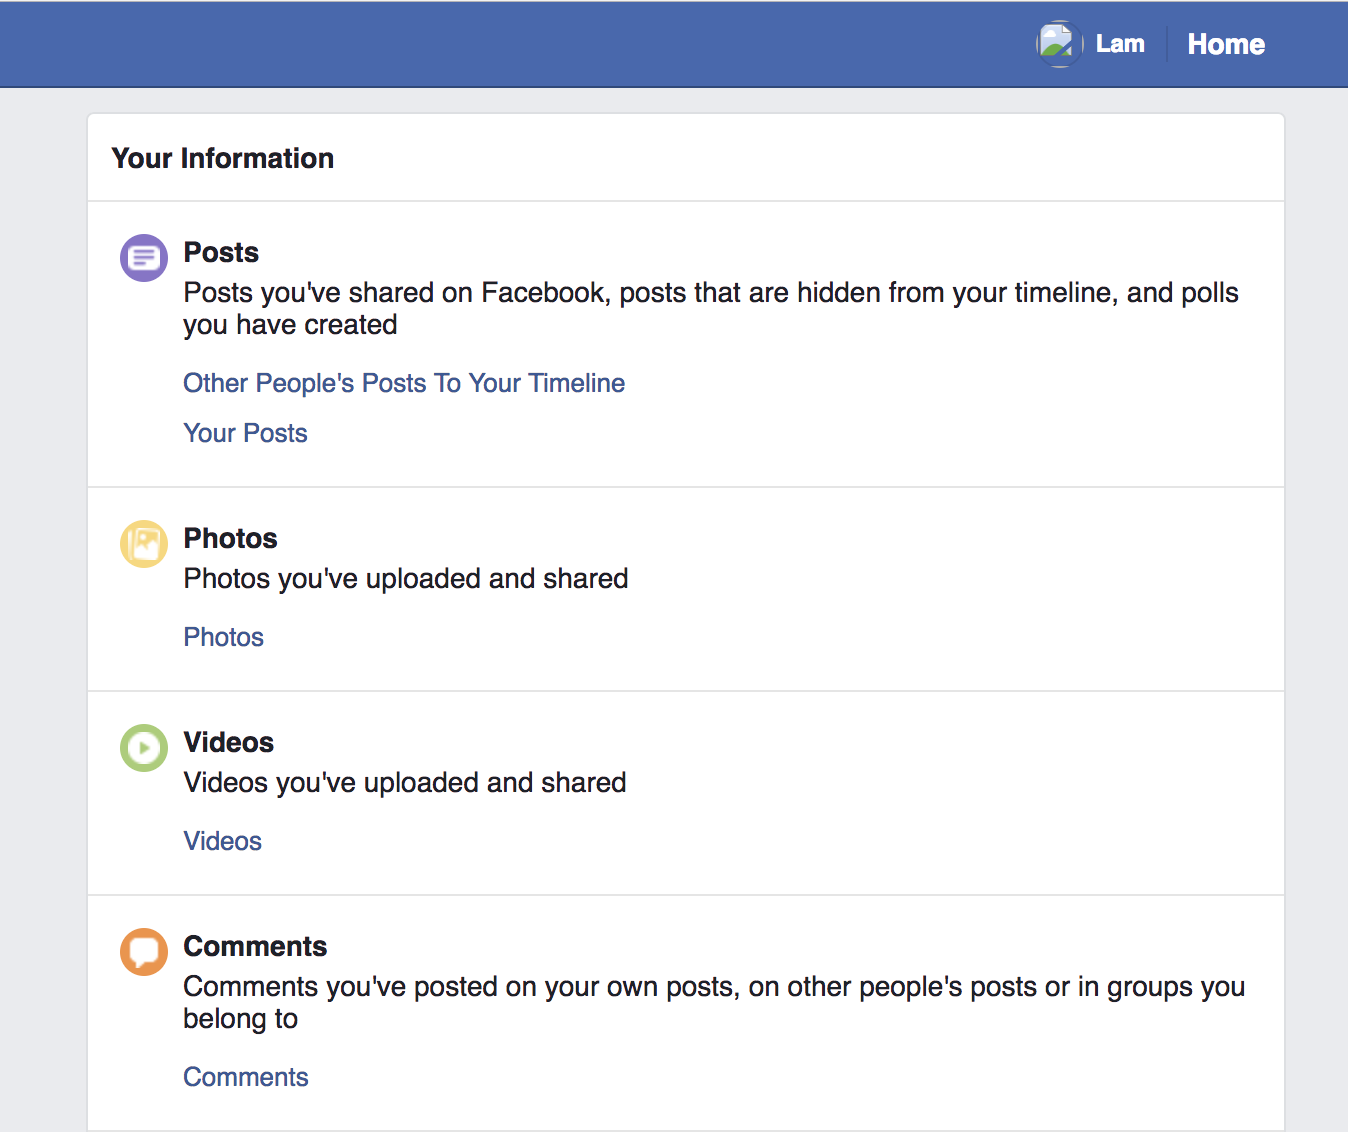
Figure 4-1: A Facebook archive profile page
This folder represents a more complete archive than what you might see when scrolling through your Facebook account online. Here, you’ll find information like all of the telephone numbers you’ve ever registered with Facebook, a code associated with the facial recognition data Facebook uses to tag you and your friends, and the ads that you’ve clicked in the past three months. The archive profile page should give you an idea about the kind of information Facebook stores about your activities and online presence for its own purposes.
Reviewing the Data and Inspecting the Code
To introduce the process of scraping, we’ll begin by looking at the ads you’ve clicked in the past three months.
Scraping generally proceeds as follows:
- Look at the visual display of information in a web browser.
- Inspect the code that contains this information.
- Instruct your scraper to grab the information from this code.
So, to start, inside the ads folder of your Facebook archive, open advertisers_you’ve_interacted_with.html, the page that contains the titles and timestamps of every advertisement you’ve clicked in the past three months.
Once you’ve looked through your ad data, it’s time to move on to the second step: inspecting the code. To do this, we’ll use Chrome’s built-in developer tools (we learned about these in Chapter 1). Start by right-clicking one of the listed advertisements and, in the drop-down list that opens, select Inspect. When the Web Inspector opens, it should highlight the code representing the ad you just right-clicked. Figure 4-2 shows the Web Inspector view in Chrome.
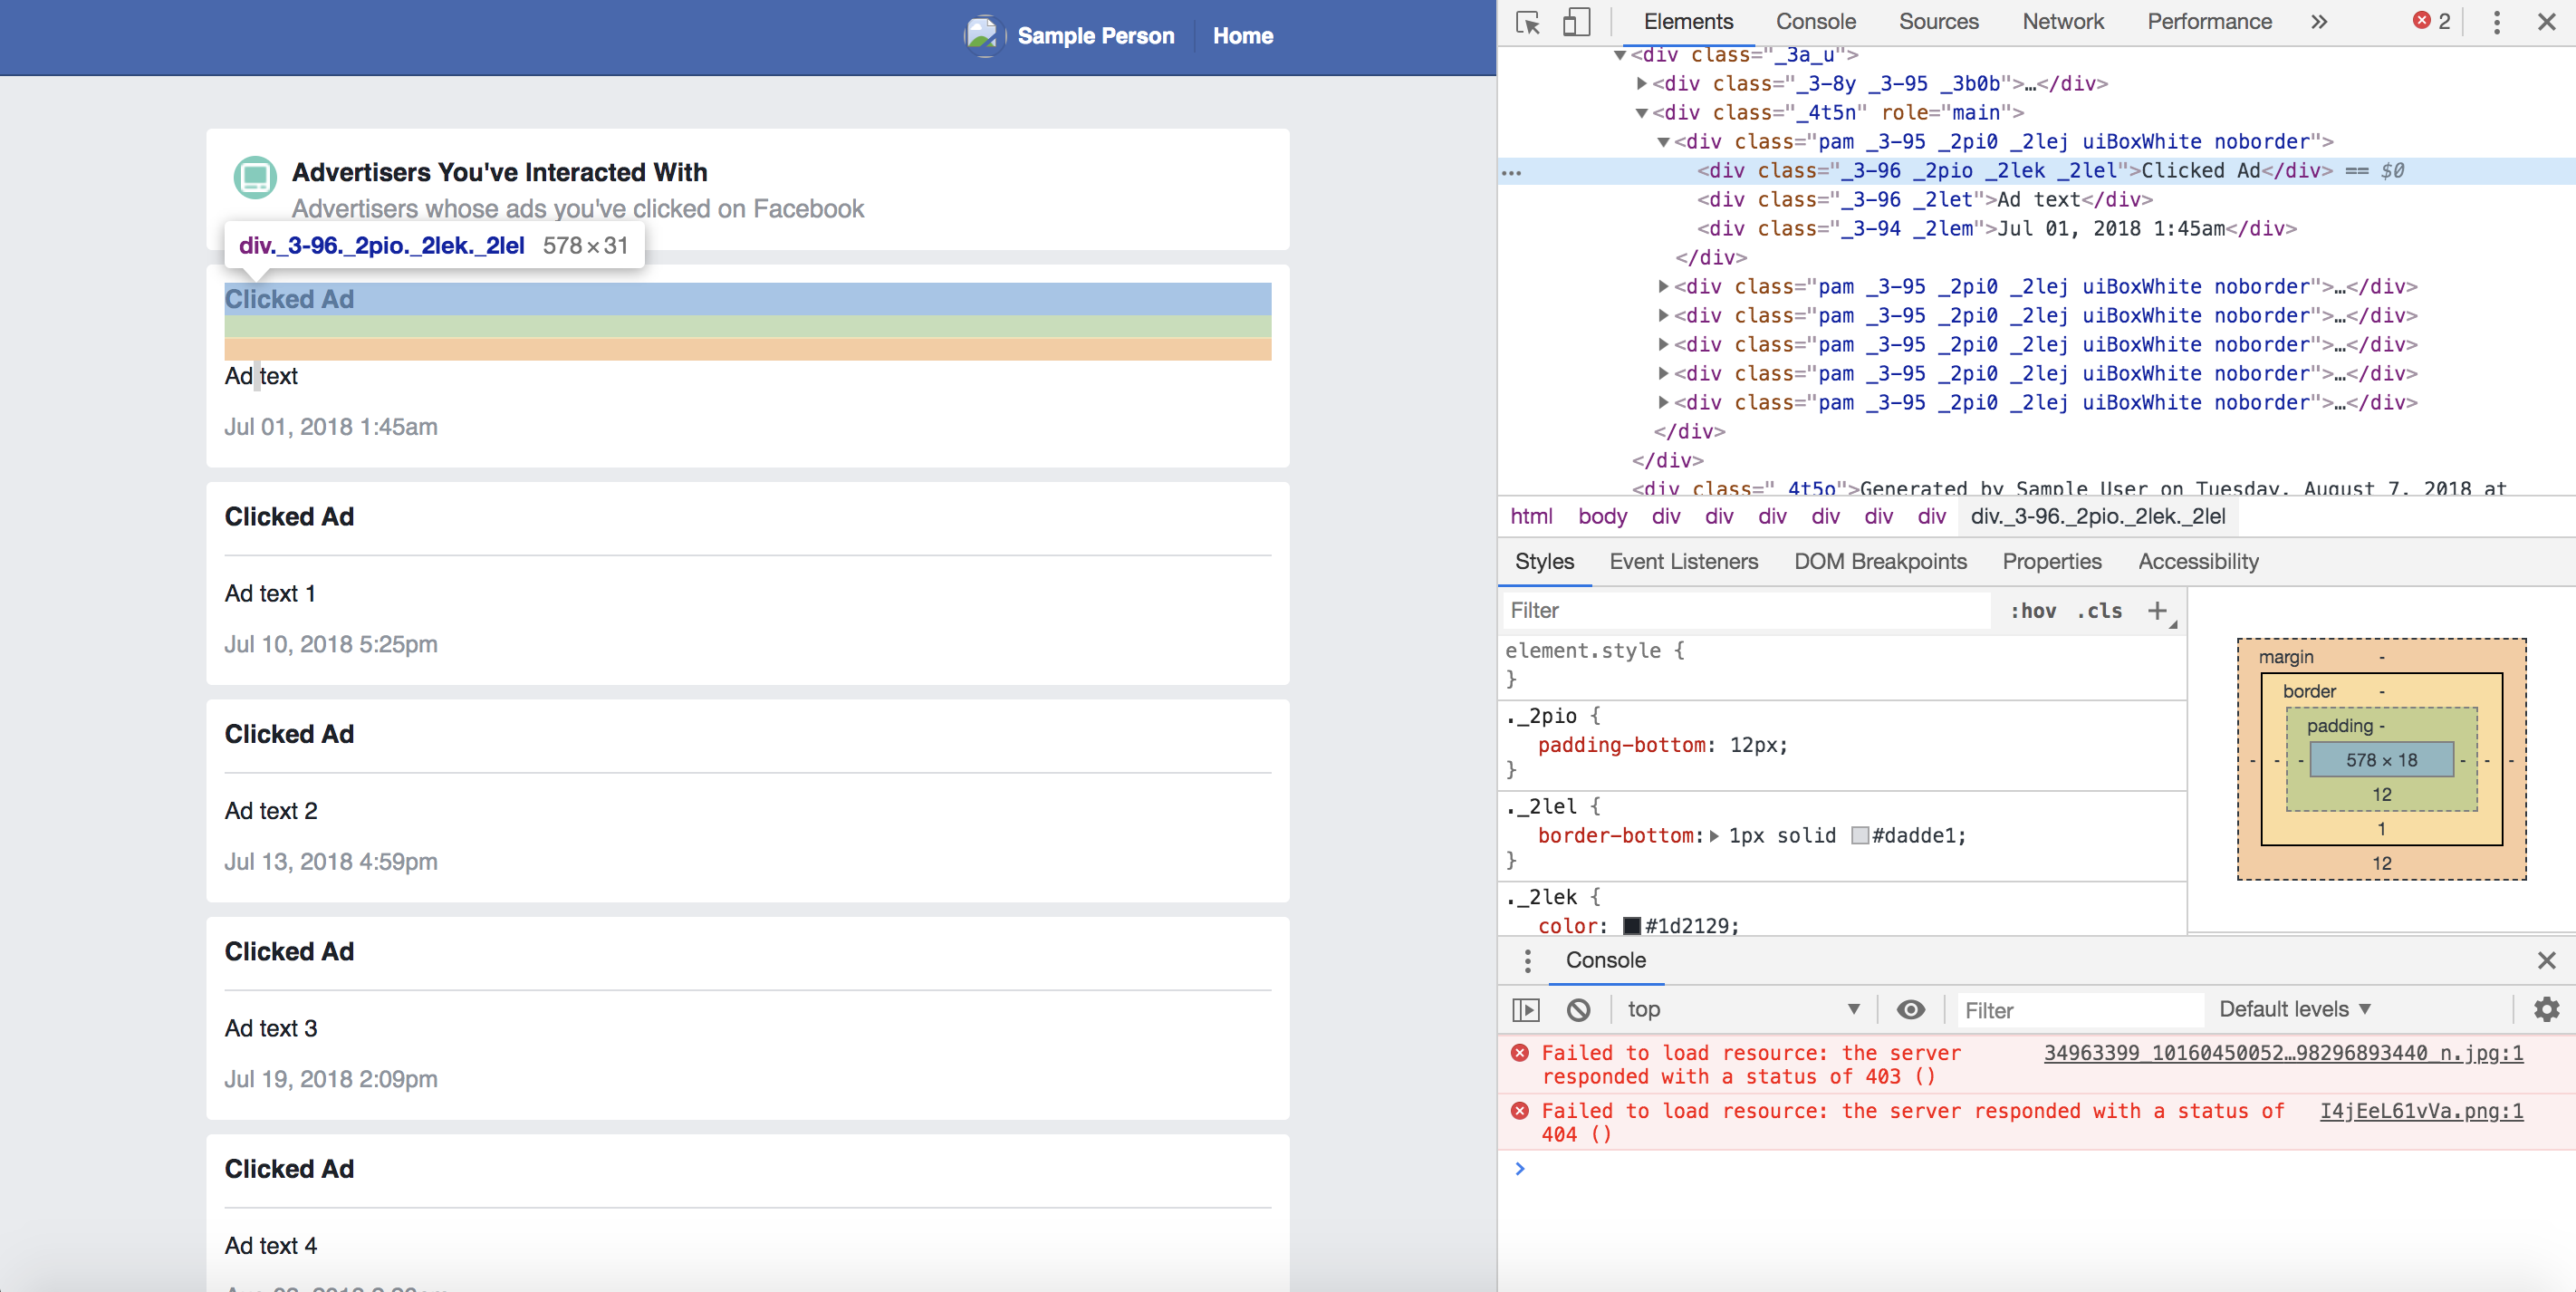
Figure 4-2: Chrome’s Web Inspector view
Recall that web pages are HTML files that contain information inside of HTML tags styled with CSS IDs and classes. When a page renders repetitive content—like posts that are featured on our news feeds or the advertisers listed in our data archive—it will likely use the same pattern of HTML tags and CSS classes to display each piece of information. In order to harvest the data contained in those HTML tags, we have to recognize and understand these patterns.
Structuring Information as Data
In this case, all the ads are inside an overall <div> tag, which has the class attribute _4t5n and the role attribute main. Listing 4-1 contains HTML code that displays a sample Facebook ad as it might be stored in an archive.
<div class="_4t5n" role="main">

  <div class="pam _3-95 _2pi0 _2lej uiBoxWhite noborder">
      <div class="_3-96 _2pio _2lek _2lel">Clicked Ad</div>
      <div class="_3-96 _2let">Ad name 1</div>
      <div class="_3-94 _2lem">Jul 01, 2019 1:45am</div>
  </div>

  <div class="pam _3-95 _2pi0 _2lej uiBoxWhite noborder">
      <div class="_3-96 _2pio _2lek _2lel">Clicked Ad</div>
      <div class="_3-96 _2let">Ad name 2</div>
      <div class="_3-94 _2lem">Jul 10, 2019 5:25pm</div>
  </div>

  <div class="pam _3-95 _2pi0 _2lej uiBoxWhite noborder">
      <div class="_3-96 _2pio _2lek _2lel">Clicked Ad</div>
      <div class="_3-96 _2let">Ad name 3</div>
      <div class="_3-94 _2lem">Jul 11, 2019 5:25pm</div>
  </div>

--snip--

</div>
Listing 4-1: Sample code for Facebook ads
Listing 4-1 includes an HTML <div> tag with the classes _3-96 and _2let (note that each individual class within a pair of quotation marks is separated by a space). This <div> tag contains the title of the Facebook ad that the user clicked. A second <div> tag with the classes _3-94 and _2lem contains the timestamp indicating when the user clicked on the ad.
If we created a spreadsheet based on this HTML, it might look like Figure 4-3.
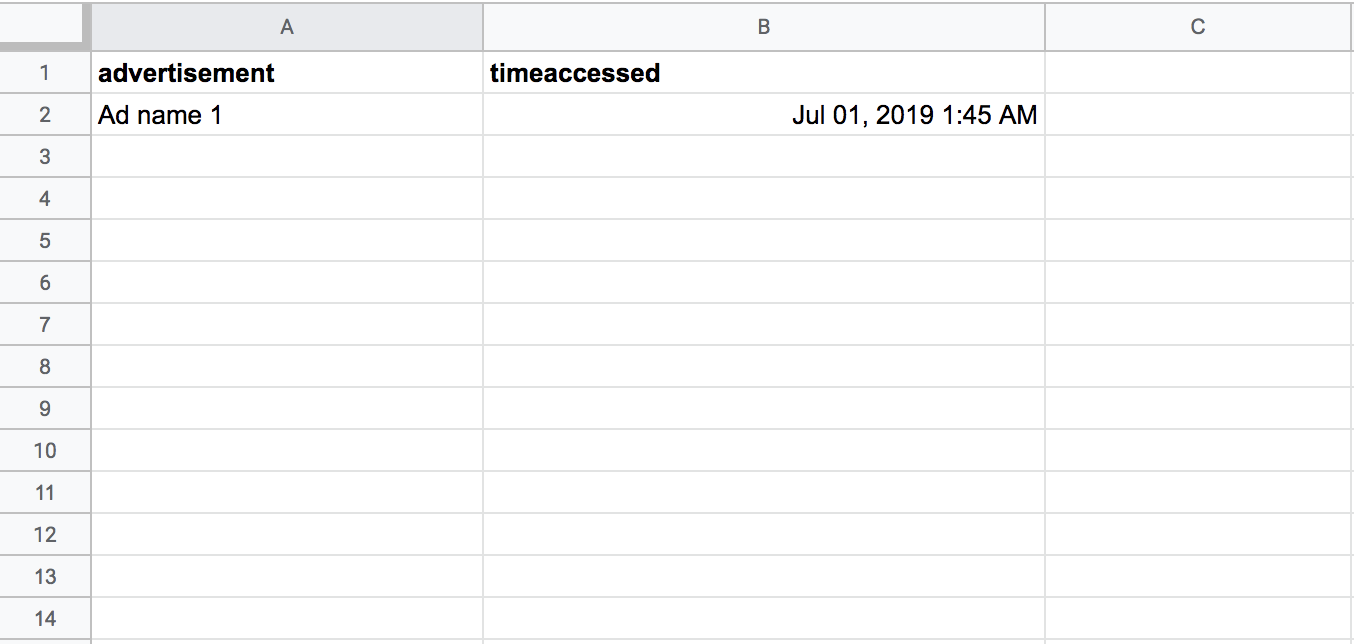
Figure 4-3: A sample spreadsheet after we’ve scraped some of the data
We’ve used two headers, advertisement and timeaccessed, to categorize and structure the data. Note that there are many ways to do this; we could have chosen only to look at the titles of the ad, or to separate the timestamp into date and time_of_day columns. Data collection is a creative process, and the solution you find will always depend on the specific project and data you’re working with.
In Figure 4-3 we started creating our spreadsheet by manually copying the data straight from the web page. Though you can scrape the web like this, as you can imagine it would take a lot of time and effort. Almost all web scraping is done automatically. So, in the next section, we’ll use Python to set up an automatic scraper.
Scraping Automatically
As with a script, you can think of a scraper as a little robot who will perform repetitive tasks for you. And like the script we used in Chapter 3, the scraper fetches data and puts it into a spreadsheet for you—except that it gets data from HTML pages instead of from an API response.
Unlike JSON, HTML data can be tricky to work with, as it’s not always structured in data-friendly ways. Going in with a plan, then, will help us identify which parts of a website may best be structured as data. As we did with our API script, let’s start by writing down our list of tasks as pseudocode, making each task a separate comment, as in Listing 4-2.
# import libraries
# open our page
# grab all the information for the ads
# put all the ad data into an list
# create a csv file
# write each line into a csv file
Listing 4-2: The plan for our script
Next we’ll import the libraries we need, shown in Listing 4-3.
# import libraries
import csv
from bs4 import BeautifulSoup
Listing 4-3: Importing our libraries
For this script we need two libraries: csv, which comes built into Python, and Beautiful Soup, a library an independent developer wrote for other Python developers to use. Beautiful Soup allows our scraper to read and understand HTML and CSS.
Because it isn’t built into Python, we’ll need to install Beautiful Soup separately before using it. We covered the library installation process in Chapter 1. In this case, you can install the library using the pip command pip install beautifulsoup4 (beautifulsoup4 refers to the fourth version of Beautiful Soup, which is the latest and most improved version of the library). After you install any library, the best way to understand and use it is to look up its documentation. You can find the documentation for Beautiful Soup at https://www.crummy.com/software/BeautifulSoup/bs4/doc/.
Now that Beautiful Soup is installed and imported, we can put it to use. Normally, Python doesn’t understand what tags are, so when it opens an HTML page, the information is just a long string of characters and spaces like this:
<div class="pam _3-95 _2pi0 _2lej uiBoxWhite noborder">
    <div class="_3-96 _2pio _2lek _2lel">Clicked Ad</div>
    <div class="_3-96 _2let">See how Facebook is changing</div>
    <div class="_3-94 _2lem">Jul 01, 2018 1:45am</div>
</div>
Beautiful Soup takes in HTML and CSS code, extracts the useful data, and turns it into objects Python can work with—a process known as parsing. Imagine Beautiful Soup as X-ray goggles that allow our scraper to see through the HTML coding language and concentrate on the content we are really interested in (bolded in the following code):
<div class="pam _3-95 _2pi0 _2lej uiBoxWhite noborder">
    <div class="_3-96 _2pio _2lek _2lel">Clicked Ad</div>
    <div class="_3-96 _2let">See how Facebook is changing</div>
    <div class="_3-94 _2lem">Jul 01, 2018 1:45am</div>
</div>
We’ll use Beautiful Soup to turn the HTML code into a list that will hold the name of each ad and the time it was accessed. First, though, create a file in the same folder that contains your archive and save it as ad_scraper.py, then set up the basic structure of your code in ad_scraper.py as shown in Listing 4-4.
import csv

from bs4 import BeautifulSoup
# make an empty array for your data
① rows = []

# set foldername
② foldername = "facebook-lamthuyvo"

# open messages
with open("%s/ads/advertisers_you've_interacted_with.html" % ③foldername) as ④page:
    soup = ⑤BeautifulSoup(page, "html.parser")
Listing 4-4: Creating an empty list and opening our file
First, we create the rows ① variable, which we’ll eventually fill with our data. Then we create the foldername variable ② to hold the name of the folder where our data currently resides, which allows us to easily modify our script in the future if we want to scrape someone else’s archive ③. Then we open the HTML file and store its information in the page variable ④. Lastly, we pass page into the BeautifulSoup() function ⑤. This function parses the HTML into a list of elements that we can work with; specifically, it turns the page into a Beautiful Soup object so the library can differentiate between HTML and other content. The second argument, “html.parser”, which we passed into BeautifulSoup(), tells Beautiful Soup to process page as HTML.
Analyzing HTML Code to Recognize Patterns
Earlier in this chapter, we saw that each ad name is encased in <div> tags with the classes _3-96 and _2let. The timestamp associated with the ad is stored in a <div> tag that has the classes _3-94 and _2lem.
You’ll notice in Listing 4-1 that some of these classes, like _3-96, may be used for other <div> tags, like the subheading containing the words Clicked Ad. Because classes are used to style <div> elements that can be used over and over, we’ll need to identify the CSS classes and tags that are unique to the type of information we want to scrape. That is, we need to be able to instruct our script to grab content only from the <div> tags that contain information about the ads we clicked. If we told our script to grab information from <div> tags without specifying classes, we would end up with a lot of extraneous information since <div> tags are used for numerous content types across the page.
Grabbing the Elements You Need
To get just the content we want, first we need to add some code that selects the parent (outer) <div> tag containing all the ad names and timestamps we want to grab. Then we’ll go into that parent <div> tag and search through each <div> tag, one by one, to collect the relevant information for each of the ads we clicked on.
Listing 4-5 shows the script that accomplishes this.
import csv

from bs4 import BeautifulSoup

--snip--

    soup = BeautifulSoup(page, "html.parser")
    # only grab the content that is relevant to us on the page using the class named "contents"
    contents = soup.find("div", ①class_="_4t5n")
    # isolate all the lists of ads
   ② ad_list = contents.find_all( "div" , class_="uiBoxWhite")
Listing 4-5: Selecting a specific <div> using Beautiful Soup
First, we look for a <div> tag with the class _4t5n ①, which we know from Listing 4-1 will contain all the <div> tags with the ad information we want to scrape. We look for this tag by applying the find() function to soup, which is the HTML that we parsed earlier in our code. We’ll then assign (using the equal sign) the results of this function to the variable contents.
To find a <div> tag that has a specific class, the find() function requires two arguments. First, it needs to know which kind of HTML tag it’s looking for. In this case, we’re looking for <div> tags, which we specify through the string “div” (make sure you keep the quotes around the word div).
But if we ran the code with only the “div” argument using soup.find("div"), our script would not return the right <div> tag for us. Instead, our scraper would go through the entire HTML file, find each <div> tag, and then render only the last one it found.
Note The find() function is designed to go through the entire code, identifying every <div> tag it finds in the code stored in the soup variable until it gets to the end. Thus, because find() is meant to find only one <div> tag, it keeps only the very last one—not all the other ones it cycled through.
To find not just any <div> tag but the one that has the _4t5n class, then, we need to pass a second argument, class_="_4t5n" ①, into the find() function. Specifying what class the <div> tag uses helps us grab only the <div> tag that we’re interested in.
Once we have a <div> containing all the ad <div>s stored in contents, we can go through contents, select every <div> tag that contains ad information, and store those <div>s in a list. We can do this by applying the find_all() function to the contents class ②. We use find_all(), not find(), to return every <div> tag with the uiBoxWhite class. The function should now return the results as a list, which we store in the ad_list variable.
Extracting the Contents
Once we have the list of advertisements, we need to grab each ad’s title and timestamp. To do this, we’ll loop through each <div> tag in ad_list using a for loop and extract its contents. Listing 4-6 shows how to do this in Python.
--snip--

    ad_list = contents.find_all("div", class_="uiBoxWhite")

    ① for item in ad_list:
           ② advert = item.find("div", class_="_2let").get_text()
           ③ timeaccessed = item.find("div", class_="_2lem").get_text()
Listing 4-6: Extracting the contents of HTML <div> tags
First, we write a statement that introduces the for loop ①. The line for item in ad_list: means that we’ll go through the list item by item, storing the current item in the item variable, and then run the process we specify in the lines following the for loop. In this case, item holds a <div> tag with the uiBoxWhite class.
Then we’ll grab a <div> tag with the class _2let from item and store it in the advert variable ②. Notice, though, that we didn’t just use find(); we also chained another function onto find() by calling get_text() at the end of the line. Python and libraries like Beautiful Soup allow you to modify the results of one function by calling another function at the end of it, a process known as chaining. In this case, the find() function allows us to grab a <div> that may look like this:
<div class="_3-96 _2let">See how Facebook is changing</div>
Then we apply the get_text() function to get the text contained inside the <div> tag:
See how Facebook is changing
We repeat this process to extract the timestamp information from the <div> tag that uses the _2lem class ③.
Whew, we just made our scraper do a ton of work! Let’s revisit our HTML code so we know what information the scraper just parsed:
① <div class="_4t5n" role="main">
  ② <div class="pam _3-95 _2pi0 _2lej uiBoxWhite noborder">
      <div class="_3-96 _2pio _2lek _2lel">Clicked Ad</div>
      ③ <div class="_3-96 _2let">See how Facebook is changing</div>
      ④ <div class="_3-94 _2lem">Jul 01, 2018 1:45am</div>
  </div>

  <div class="pam _3-95 _2pi0 _2lej uiBoxWhite noborder">
      <div class="_3-96 _2pio _2lek _2lel">Clicked Ad</div>
      <div class="_3-96 _2let">Ad name 2</div>
      <div class="_3-94 _2lem">Jul 10, 2018 5:25pm</div>
  </div>

  <div class="pam _3-95 _2pi0 _2lej uiBoxWhite noborder">
      <div class="_3-96 _2pio _2lek _2lel">Clicked Ad</div>
      <div class="_3-96 _2let">Ad name 3</div>
      <div class="_3-94 _2lem">Jul 11, 2018 5:25pm</div>
  </div>

--snip--

</div>
To recap: our scraper first found the <div> tag that contained all ads ①, turned each ad into a list item ②, and then went through each ad, extracting its title ③ and timestamp ④ from each nested <div> tag.
Writing Data into a Spreadsheet
Now we know how to use our scraper to get the information we need. But we haven’t told our little robot what to do with this information just yet. This is where .csv files can be helpful—it’s time to tell our scraper to turn the data it’s been reading into a spreadsheet that we humans can read.
Building Your Rows List
We need to instruct our script to write every row of data into a spreadsheet, just like we did when we wrote an API. But this time we’ll do so by creating a Python dictionary, a data structure that allows us to assign specific data points (values) to specific data categories (keys). A dictionary is similar to JSON in that it maps a value to a key.
In its simplest form, a dictionary looks like this:
row = {

    "key_1": "value_1",

    "key_2": "value_2"

    }
In this example, I define a variable called row using a pair of braces ({}). The data in the dictionary is inside those braces (note that I added some line breaks and spaces to make the dictionary more legible).
In a dictionary, our values are stored in pairs of keys and values. In this case, there are two keys, “key_1” and “key_2”, and each is paired with a value, “value_2” and “value_2”. Each key-value pair is separated by a comma, making this a list of two different pairs. Imagine keys as column headers in a spreadsheet. In this example, the string key_1 would represent the column header, and value_1 would be one of the cells in that column. If this structure looks familiar, it’s no accident: this is how JSON data is structured. In some ways, you can look at Python dictionaries as blueprints for data that may be structured in the JSON format.
To return to our specific example, let’s create a dictionary for our data and append it to our .csv file, as shown in Listing 4-7.
--snip--

for item in ad_list:
      advert = item.find("div", class_="_2let").get_text()
      timeaccessed = item.find("div", class_="_2lem").get_text()

      ① row = {
         ② "advert": ③advert,
         ② "timeaccessed": ③timeaccessed
         }
      ④ rows.append(row)
Listing 4-7: Writing data to the .csv file
The keys "advert" and "timeaccessed" ② are strings that represent the types of data we want to collect—the equivalent of column headers in our spreadsheet. Each key is paired with a variable: the "advert" key goes with the advert variable and the “timeaccessed” key with the timeaccessed variable ③. Recall that we used these variables earlier to temporarily store the text we extracted from each HTML element using Beautiful Soup. We store this dictionary in the row variable ①.
Once we have our row, we need to store it with the other rows. This is where the rows variable we defined at the top of our script comes into play. During each iteration of the for loop, we add another row of data to the rows list by using the append() function ④. This allows us to grab the latest values from each list item, assign those values to the appropriate keys, and append the keys and values to our rows variable. This entire process allows us to accumulate a new row of data with each loop, ensuring that we extract information about every single ad we clicked on and that we populate the rows list with this data so we can write it into a .csv file in the next step.
Writing to Your .csv File
Last but not least, we need to open a .csv file and write each row to it. As stated before, this process is a little bit different from what you saw in Chapter 3. Instead of using the simple writer() function the csv library offers, we’ll be using DictWriter(), a function that knows how to handle dictionaries. This should help us avoid any careless mistakes, like accidentally swapping our column values.
Listing 4-8 shows the code to create the .csv file.
--snip--

① with open("../output/%s-all-advertisers.csv" % foldername, "w+") as csvfile :
    ② fieldnames = ["advert", "timeaccessed"]
    writer = csv.DictWriter(csvfile, fieldnames=fieldnames) ③
    writer.writeheader() ④
    for row in rows: ⑤
         writer.writerow(row)⑥
Listing 4-8: Turning data into a .csv file
First, we create and open a new file ① using the string facebook-
We then use the writeheader() function ④ to write the first row of our .csv file, the headers for each column. Since writer already knows those field names from the previous line, we don’t need to specify anything, and our .csv file should now look like this:
advert,metadata
All that’s left is to add our data. By looping through each row in rows ⑤, we can write each row of data into our spreadsheet⑥.
Finally, once we stitch all the pieces together, our script should look like Listing 4-9.
import csv
from bs4 import BeautifulSoup
rows = []
foldername = "facebook-lamthuyvo"
with open("%s/ads/advertisers_you've_interacted_with.html" % foldername) as page:
    soup = BeautifulSoup(page,  "html.parser")
    contents = soup.find("div", class_="_4t5n")
    ad_list = contents.find_all( "div" , class_="uiBoxWhite")
    for item in ad_list:
        advert = item.find("div", class_="_2let").get_text()
        metadata = item.find("div", class_="_2lem").get_text()
        row = { "advert": advert,
                "metadata": metadata
              }
        rows.append(row)

with open("%s-all-advertisers.csv" % foldername, "w+") as csvfile:
    fieldnames = ["advert", "metadata"]
    writer = csv.DictWriter(csvfile, fieldnames=fieldnames)
    writer.writeheader()
    for row in rows:
        writer.writerow(row)
Listing 4-9: The complete scraper script
Looks good! Let’s try it out.
Running the Script
At the beginning of this chapter, you saved your file as a script called ad_scraper.py in the same folder that contains your Facebook archive. Now you can run it like you would any other Python script. In the console, navigate to that specific folder. For Mac users, run the following command:
python3 ad_scraper.py
On Windows machines, run this code instead:
python ad_scraper.py
Once you run the script, your scraper should go through every ad you’ve clicked in the past three months, and you should see a file whose name ends with -all-advertisers.csv. This file should contain the title and timestamp for every ad listed in the archive page advertisers_you've_interacted_with.html. This data will help you better understand your behavior on Facebook; for example, you can use it to learn on what days or in which months you clicked on a lot of ads. Or you could look into what ads you may have clicked multiple times.
The example in this chapter represents a very simple version of web scraping: the HTML page we scraped was one we could download (not one we had to open by connecting to the internet), and the amount of data we scraped from the page was not large.
Scraping simple HTML pages like those of our archive is a good introduction to the basic principles of web scraping. Hopefully, this exercise will help you transition to scraping websites that are more complicated—whether it’s web pages that are hosted online and that change frequently, or HTML pages with much more complicated structures.
Summary
In this chapter, you learned how to inspect an HTML page from your Facebook archive to find patterns in the code that allow you to structure what you see on the page as data. You learned how to use the Beautiful Soup library to read in the HTML page, identify and grab the <div> tags that contain the information you want to collect, store that information in rows of data using a dictionary, and lastly, write that dictionary to a .csv file using the DictWriter() function. But more importantly, you learned how to extract information from a web page and write it into a data file that you can feed into various analytical tools like Google Sheets or into a Python-rendering web app like Jupyter Notebook—two tools we’ll see in later chapters. This means we have now taken information that was locked into a web page and transformed it into a format that is much easier to analyze!
In the next chapter, we’ll build on what you’ve learned here by applying similar processes to scrape a website that is live on the internet.