Chapter 3: Getting Data with Code
By now, you’ve seen how to call an API through your browser to access specific data. Next, you’ll learn how to make these calls through a Python script and how to read data, store it, and write it into a file.
Previously, we typed lines of Python directly into an interactive shell that interpreted them, helping convey instantly how Python works. But as we’re moving toward more complicated uses of Python, we’ll need to shift gears and start using a text editor to write Python scripts.
You can write scripts in a free text editor preinstalled on your computer, such as TextEdit on Mac or WordPad on Windows, but it’s better to write and edit code in a text editor designed for developers. These text editors have syntax highlighting, which colors code to make it easier to read. A good, free text editor I recommend is Atom, which you can download at https://atom.io.
Writing Your First Script
Now we can write a script! Let’s start by organizing our files. Create a folder in a memorable place and name it python_scripts. For both Mac and Windows, I recommend saving it in the Documents folder. Then open a text editor and create a blank file (in Atom, select File>New File).
Save this file in your python_scripts folder (File>Save As…) with the name youtube_script.py. The file extension .py tells the text editor that the language in the text file is Python.
When you’re naming your files, a good rule of thumb is to use all lowercase and to make sure the name describes what the script actually does. You can’t use spaces in a script’s filename or start the name with a number. So, if your filename gets very long, separate the individual words with underscores or dashes instead of spaces (as we’ve done with youtube_script.py). Python is case sensitive, so referring to the same file using different capitalization or making typos can result in broken code and a lot of headaches.
Now enter the following code into youtube_script.py and then save it:
print("This is my first Python script!")
Next we’ll need to open a command line interface (CLI), which we used to access the Python interactive shell in Chapter 1. CLIs allow you to use lines of code to navigate through your computer’s files. You can move files from one folder to another, create and delete files, and even access the internet through them. A CLI can run scripts as well.
Running a Script
Open your CLI like you did in Chapter 1, using the Terminal for Mac or the Command Prompt for Windows. In order to run a script, you need to navigate to the directory, or folder, that contains it. On a Mac, you can run the ls command, which stands for list, to see where you are on your hard drive. On Windows, you can run the dir command, which stands for directory. When you run these commands, your CLI should list the files within the directory where it’s currently located, as shown in Figure 3-1.
Now you need to navigate into the folder you created earlier, python_scripts. This can be a stumbling block at first if you’re used to navigating folders using icons. To access a folder in a CLI, instead of clicking icons we need to specify a filepath, which is the path of folders leading to the file we want to access. On Mac this is usually the name of the folders separated by forward slashes, and on Windows it’s typically the name of the hard drive followed by the folder names separated by backslashes. For example, if you saved your python_scripts folder inside the Documents folder on Mac or Windows, the paths for each folder should be Documents/python_scripts and C:\Documents\python_scripts, respectively. If you saved your folder in a different location, you can also navigate to the file’s folder in Finder (Mac) or File Explorer (Windows) and copy the path displayed in the window.
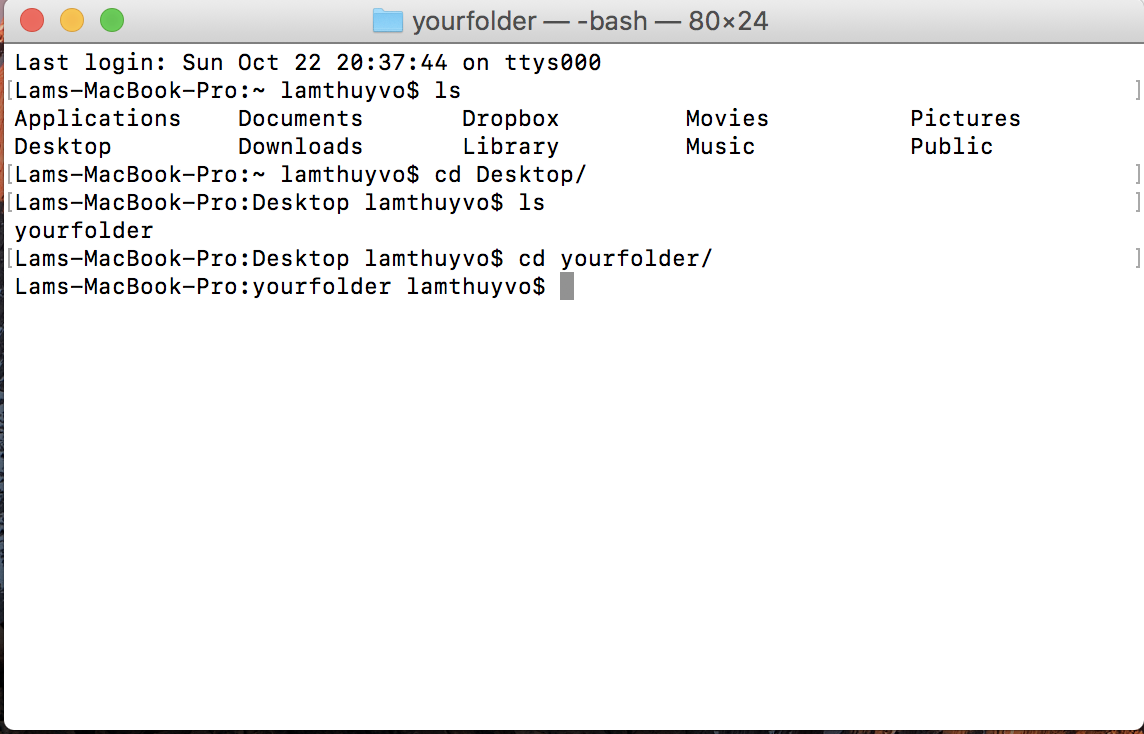
Figure 3-1: The listing for the current directory
To navigate to a folder through the CLI, you use the command cd (which stands for change directory), followed by the path of your folder. For example, if you stored your folder in the Documents folder on a Mac, run this command:
cd Documents/python_scripts
For Windows, you would run this command:
cd C:\Documents\python_script
Once you are in the folder that contains your Python script, you’ll need to use another command to run the script. Enter this command in the CLI for Mac:
python3 youtube_script.py
For Windows, enter:
python youtube_script.py
On Macs, the command python3 tells your CLI that you’re about to run a script written in Python (version 3), and youtube_script.py is the name and extension of the file you want the CLI to run.
We’re taking off! This is what you should see in the CLI after running the script:
This is my first Python script!
The script executes the print() function you entered in the previous section. Now that you’ve seen how to run scripts, let’s write one that will do what we want.
Planning Out a Script
Each script we run will perform a series of tasks. When you first start writing a script, you should list and describe these tasks to help organize your thoughts. This practice is sometimes referred to as pseudocoding. Pseudocoding is best done with comments, which are lines in your script that are purely for you or others reading your code, and aren’t run by the computer. You can think of pseudocoding comments as a to-do list you’ll use when coding later to remind yourself what each part of your code should do. The comments can also serve as descriptive notes to help others understand what your script does.
Let’s start laying out a to-do list directly into the script. Create a comment in your youtube_script.py file by using a hashtag (#) and writing out a note, as shown in Listing 3-1.
# Import all needed libraries
# Open the URL and read the API response
# Identify each data point in your JSON and print it to a spreadsheet
Listing 3-1: Pseudocoding the steps to perform in your script
Each hashtag tells Python that the rest of the text on the line is a comment. Listing 3-1 has three comments on three separate lines. To write our script, we’ll need to first import some libraries, which are prepackaged code files. Then, we’ll open a URL-based API call and read the response as we did in Chapter 2. Finally, we’ll store the returned data in a spreadsheet so we can analyze it.
Now that we have an outline, we can run through each task and add the code that performs it.
Libraries and pip
Throughout your long and surely successful career as a data sleuth, you won’t have to write every function you’ll ever use. Python is open source, as you learned earlier, which means that many developers have written functions that we can use for free. Most, if not all, coders depend on code that someone else has written and published for others to use; this is known as a coding library. As you tackle more complicated tasks with Python, you’ll need to install and use coding libraries.
There are two kinds of libraries:
The libraries included in the Python standard library—the set of tools that comes with Python and is included by default when we install Python on our computer
Third-party libraries, which we can use only once we’ve installed them on our computer
First, let’s discuss the libraries that are automatically installed with Python, and were written by its developers. Here are some of the most common libraries that we’ll use:
csv Allows us to read and write .csv files, which can be opened as an Excel spreadsheet or Google Sheet. CSV stands for comma-separated values, which is a common way to format data.
json Enables us to read data that has been formatted in JSON.
datetime Allows our computers to understand and translate date formats and enables us to reformat them as needed.
Before we can use a library, we need to import it, which is like downloading an ebook onto your tablet before you can read it. To load a library, you use the Python keyword import and then specify the library’s name, such as csv. For example, to load the csv library into the interactive shell, you would enter the following:
import csv
Using Python libraries from the wider Python community is a little trickier. Most of these libraries can be found on PyPI (the Python Package Index; https://pypi.python.org/pypi), a site where you can browse through the descriptions and code of libraries other people have uploaded for public use.
The easiest way to get these libraries is through pip, a library that was written to help developers manage other libraries (how meta!). You can install pip using the instructions at https://pip.pypa.io/en/stable/installing/.
Once you’ve installed pip, you can use it to install any library listed on PyPI. To install a library, enter this simple formula into your CLI (replace library_name with the name listed on PyPI):
pip install library_name
These are some of the PyPI libraries we use in this book:
requests Allows us to open websites using a URL.
beautifulsoup4 Helps us read the HTML and CSS code of websites.
pandas Enables us to parse millions of rows of data, modify it, apply math to it, and export the results of our analysis.
To follow the exercises in this book, install these libraries by running the following commands in your CLI one by one, pressing enter after each (make sure you’re connected to the internet when you do this!):
pip install requests
pip install beautifulsoup4
pip install pandas
We’ll tackle how to use each library as we go through the book’s exercises.
Now that we know how to access libraries, let’s deploy them in our script! Returning to our Python script youtube_script.py, let’s go to the part of our pseudocode that contains the comment about importing all needed libraries. We’ll use two of the libraries mentioned earlier that come preinstalled with Python, json and csv. We’ll also use the requests library that we just installed, which allows us to open URLs. Enter the code from Listing 3-2 into youtube_script.py.
import csv
import json
import requests

--snip--
Listing 3-2: Importing the libraries we need in our script
You can see that we’re using the keyword import to load each library—that’s all there is to it! Now let’s move on to the next task in our to-do list: opening the URL to make the API call.
Creating a URL-based API Call
In order to make our API call, we’ll use the requests library we just imported, as shown in Listing 3-3.
--snip--

import requests

api_url = "https://www.googleapis.com/youtube/v3/search?part=\
snippet&channelId=UCJFp8uSYCjXOMnkUyb3CQ3Q&key=YOUTUBE_APP_KEY"①
api_response = requests.get(api_url)②
videos = json.loads(api_response.text)③
Listing 3-3: Making an API call using the requests library
First, we’ll need to create the URL, which we do by creating the variable api_url and assigning it to a URL similar to the one we used in Chapter 2 ① (we dropped the parameter for videos that include the term cake and put the snippet specification before the channel ID, something that will come in handy later in “Storing Values That Change in Variables” on page 57). Now that we’ve set up the URL, we can use the requests library to connect to the internet, make the API call, and receive the API’s response.
To access a function from any library, we need to refer to it by using the library’s name—in this case, requests. Then we chain the function to the library name by preceding the function with a period. In this case, we’ll use the function get(), which takes a URL string as an argument and makes a request to that URL. In Python, we call functions that belong to a library by typing the library’s name, followed by a period, and finally the function name. For example, the get() function is part of the requests library, so we write requests.get() to call it.
We stored the string of the URL we want to access in the variable api_url, so we pass that to the get() function. The response library then offers us a number of options to receive our response. Then we store this API response in a variable called api_response ②.
Last but not least, we call the loads() function from the json library ③, which helps us translate the plain api_response text into JSON keys and values. The loads() function requires text but by default, the requests library returns an HTTP status code, which is generally a numbered response like 200 for a working website or 404 for one that wasn’t found. We need to access the text of our response, or in this case the JSON rendering of our data. We can do so by putting a period after api_response variable, followed by the option .text. The entire construction thus looks like this: json.loads(api_response.text) ③. This converts the response of our API call into text for our Python script to interpret it as JSON keys and values. We’ll look more closely at this line of code and what it does next section in this chapter.
As you can see, we’re using a lot of descriptive variables in this script. This helps us break up the script into parts that we’ll be able to track clearly.
Storing Data in a Spreadsheet
All right, items 1 and 2 of our pseudocode to-do list are complete—we’ve imported our libraries and received the API response. It’s time to move on to the next step: retrieving the data points from the JSON to put into a spreadsheet. To do that, we’ll use the csv library. First, though, let’s see how we can create a .csv file and write information to it. Enter the code from Listing 3-4 into your Python script.
--snip--

videos = json.loads(api_response.text)
with open("youtube_videos.csv", "w") as csv_file:①
    csv_writer = csv.writer(csv_file)②
    csv_writer.writerow(["publishedAt",③
                         "title",
                         "description",
                         "thumbnailurl"])
Listing 3-4: Creating the headers of the .csv file
To create the .csv file, we use the open() function ①, which is built into Python and opens or creates a file based on the arguments given to it. The open() function takes two strings as arguments, each separated by a comma. The first argument is the name of the .csv file that we want to create or open, which in this example is “youtube_videos_posts.csv”. The second argument specifies whether we want to read the file (“r”), write into the file and erase everything else that was in it before (“w”), or simply add more content to the file (“a”). In this case, we want to write a completely new file. While the open() function sounds like it can only open files, it is also smart enough to check whether a file with a name that matches the first argument already exists. If the open() function doesn’t find one, Python will know to create a new .csv file. Next, we need to assign the file to a variable so we can reference the file in our code.
You may notice that instead of assigning the file directly to a variable using an equal sign, we use the open() function in a with statement. A with statement opens a file and closes it automatically once we’ve finished modifying it. We construct a with statement by writing the keyword with, followed by the open() function. Then we use the word as followed by a variable name, like csv_file, which we’ll use to refer to the file we’re opening. The with statement ends with a colon, like the other types of statements you’ve learned about. After the colon, Python expects indented lines of code detailing a set of actions to be executed on the file. Once Python has executed those actions and the code is de-indented, the with statement will close the file.
Next we open the .csv file by using the csv library’s writer() function, which allows us to write rows of data into the file ②. To keep things simple, we’ll start by writing just one row of data. The writer() function requires a .csv file as an argument, so we pass it csv_file. We store all of this in the variable csv_writer. Finally, we write our first row into the .csv file using the writerow() function, which takes a list of strings as an argument ③. The first row of data should be the list of headers for our spreadsheet, describing the kind of content that each row will contain.
Now that we have a spreadsheet with headers, it’s time to grab the data from the API response and write it into the .csv file!
For this task, we’ll deploy our trusty old friend, the for loop, which we first encountered in Chapter 1. As we know, JSON data comes in sets of braces that contain various data points, and each data point comes in pairs of keys and values. We previously used a for loop to cycle through data in a list. Now, we’ll use one to cycle through the data associated with each post and to access the data values using each data point’s key.
In order to do this, first we’ll need to look at how the JSON data is organized in Python. Let’s step back to earlier in the code, when we loaded the JSON, as reproduced in Listing 3-5.
--snip--

api_response = requests.get(api_url)
videos = json.loads(api_response.text)①

--snip--
Listing 3-5: Loading the JSON data
As you may remember, a loop requires a list of items to go through. In this case, we have a list of all our YouTube videos as JSON objects. We stored these posts into the videos variable earlier in our script ①. Now, we can select videos using the for loop, but in order to access the post information we want, we’ll need to navigate through the structure of the JSON object and see what the load() function does.
Converting JSON into a Dictionary
When Python loads JSON using the json.load() function, it converts the JSON data into a Python dictionary. A dictionary is similar to a list, but instead of simply storing multiple values, it stores values in key-value pairs—just like JSON! Let’s see how this works with an example.
Fire up your interactive Python shell, and then enter the following:
>>> cat_dictionary = {"cat_name": "Maru", "location": "Japan"}
As you can see, we’re using the variable cat_dictionary. Then we created a dictionary with the key names cat_name and location and paired them with the values Maru and Japan, respectively. Once you press enter, your interactive shell will assign this dictionary to the variable cat_dictionary. So far, so good. But how do you access each data item?
Remember each key is associated with a value. So, to access the data value stored with a key, first we need to type the name of the variable storing our dictionary, followed by the key name as a string inside square brackets. If we wanted to access the string ‘Maru’ stored with the key “cat_name”, for instance, we would type the following:
>>> cat_dictionary["cat_name"]
>>> 'Maru'
Now let’s access the stored JSON data using the script.
Going Back to the Script
Every website has JSON objects that are organized into key-value pairs, but not every site will use the same key names or overall JSON structure. In Chapter 2 you saw that YouTube’s JSON is organized as shown in Listing 3-6.
 "items"①: [

  {
   "kind": "youtube#searchResult",
   "etag": "\"XI7nbFXulYBIpL0ayR_gDh3eu1k/wiczu7uNikHDvDfTYeIGvLJQbBg\"",
   "id": {
    "kind": "youtube#video",
    "videoId": "P-Kq9edwyDs"
   },

   "snippet": {
    "publishedAt": "2016-12-10T17:00:01.000Z",
    "channelId": "UCJFp8uSYCjXOMnkUyb3CQ3Q",
    "title": "Chocolate Crepe Cake",
    "description": "Customize & buy the Tasty Cookbook here: http://bzfd.it/2fpfeu5 Here is what you'll need! MILLE CREPE CAKE Servings: 8 INGREDIENTS Crepes 6 ...",
    "thumbnails": {
     "default": {
      "url": "https://i.ytimg.com/vi/P-Kq9edwyDs/default.jpg",
      "width": 120,
      "height": 90
     },
     "medium": {
      "url": "https://i.ytimg.com/vi/P-Kq9edwyDs/mqdefault.jpg",
      "width": 320,
      "height": 180
     },
     "high": {
      "url": "https://i.ytimg.com/vi/P-Kq9edwyDs/hqdefault.jpg",
      "width": 480,
      "height": 360
     }
    },
    "channelTitle": "Tasty",
    "liveBroadcastContent": "none"
   }
  },
  {
   "kind": "youtube#searchResult",
   "etag": "\"XI7nbFXulYBIpL0ayR_gDh3eu1k/Fe41OtBUjCV35t68y-E21BCpmsw\"",
   "id": {
    "kind": "youtube#video",
    "videoId": "_eOA-zawYEA"
   },
   "snippet": {
    "publishedAt": "2016-02-25T22:23:40.000Z",
    "channelId": "UCJFp8uSYCjXOMnkUyb3CQ3Q",
    "title": "Chicken Pot Pie (As Made By Wolfgang Puck)",
    "description": "Read more! - http://bzfd.it/1XPgzLN Recipe! 2 pounds cooked boneless, skinless chicken, shredded Salt Freshly ground black pepper 4 tablespoons vegetable ...",
    "thumbnails": {
     "default": {
      "url": "https://i.ytimg.com/vi/_eOA-zawYEA/default.jpg",
      "width": 120,
      "height": 90
     },
     "medium": {
      "url": "https://i.ytimg.com/vi/_eOA-zawYEA/mqdefault.jpg",
      "width": 320,
      "height": 180
     },
     "high": {
      "url": "https://i.ytimg.com/vi/_eOA-zawYEA/hqdefault.jpg",
      "width": 480,
      "height": 360
     }
    },
    "channelTitle": "Tasty",
    "liveBroadcastContent": "none"
   }
  },

--snip--
Listing 3-6: YouTube’s JSON data structure
In YouTube’s case, all the video data is contained as a value under the “items” key ①. This means that in order to access any video information, you’ll need to navigate into the “items” key’s values by selecting items using brackets and quotation marks: videos[‘items’]. You can use either double quotes or single quotes for Python strings, so “items” is the same as ‘items’.
Add the loop in Listing 3-7 to your own script.
Note This snippet shows code that is indented because it is still within the scope of the with open() statement that we began writing in Listing 3-4.
--snip--

    if videos.get("items") is not None:①
        for video in videos.get("items"):②
            video_data_row = [
                        video["snippet"]["publishedAt"],
                        video["snippet"]["title"],
                        video["snippet"]["description"],
                        video["snippet"]["thumbnails"]["default"]["url"]
                    ]③
            csv_writer.writerow(video_data_row)④
Listing 3-7: Using a for loop to write the data into the .csv file
First we create an if statement that instructs our code to gather information only if the API call does indeed return our video items. The .get() function will return None if the API call returns no JSON structure with the “items” key (this helps us avoid errors that could interrupt our script for when we may have reached the limit of how much data YouTube allows us to gather) ①. We then indent the code and create a for loop and access the post data using videos.get("items") ②. Now that we have the loop set up, we can cycle through each video and store its data points as a list. Once we have a list of data points, we can write the full list to the .csv file. We need each data point to exactly match the order of the spreadsheet headers we created earlier in the script, or the data won’t be organized correctly. This means that the list needs to comprise the video’s publication date, title, description, and thumbnail URL, in that order.
Since each post is also organized into a dictionary, we create the list by selecting each value through its key: video["snippet"]["publishedAt"]. Then we put the values inside a list ③. Last but not least, we can write each row into our spreadsheet using the writerow() function ④, as we did when we wrote our spreadsheet headers. When you run the script, the for loop will run this code for each post in the JSON object.
Running the Finished Script
The finished script should look something like Listing 3-8.
import csv
import json
import requests

api_url = "https://www.googleapis.com/youtube/v3/search?part=snippet&channelId=UCJFp8uSYCjXOMnkUyb3CQ3Q&key=YOUTUBE_APP_KEY"
api_response = requests.get(api_url)
videos=json.loads(api_response.text)

with open("youtube_videos.csv", "w", encoding="utf-8") as csv_file:
    csv_writer = csv.writer(csv_file)
    csv_writer.writerow(["publishedAt",
                         "title",
                         "description",
                         "thumbnailurl"])

    if videos.get("items") is not None:
        for video in videos.get("items"):
            video_data_row  = [
                video["snippet"]["publishedAt"],
                video["snippet"]["title"],
                video["snippet"]["description"],
                video["snippet"]["thumbnails"]["default"]["url"]
                ]

            csv_writer.writerow(video_data_row)
Listing 3-8: The functioning script
Congratulations! We have officially written a script that harvests data from APIs for us.
Now that your script is ready, save it and then try running it by following the instructions in “Running a Script” on page 44. Once you run the script, you should find a .csv file named youtube_videos.csv in the same folder as your script. When you open the file in a spreadsheet program, it should contain YouTube video data that looks something like Figure 3-2.
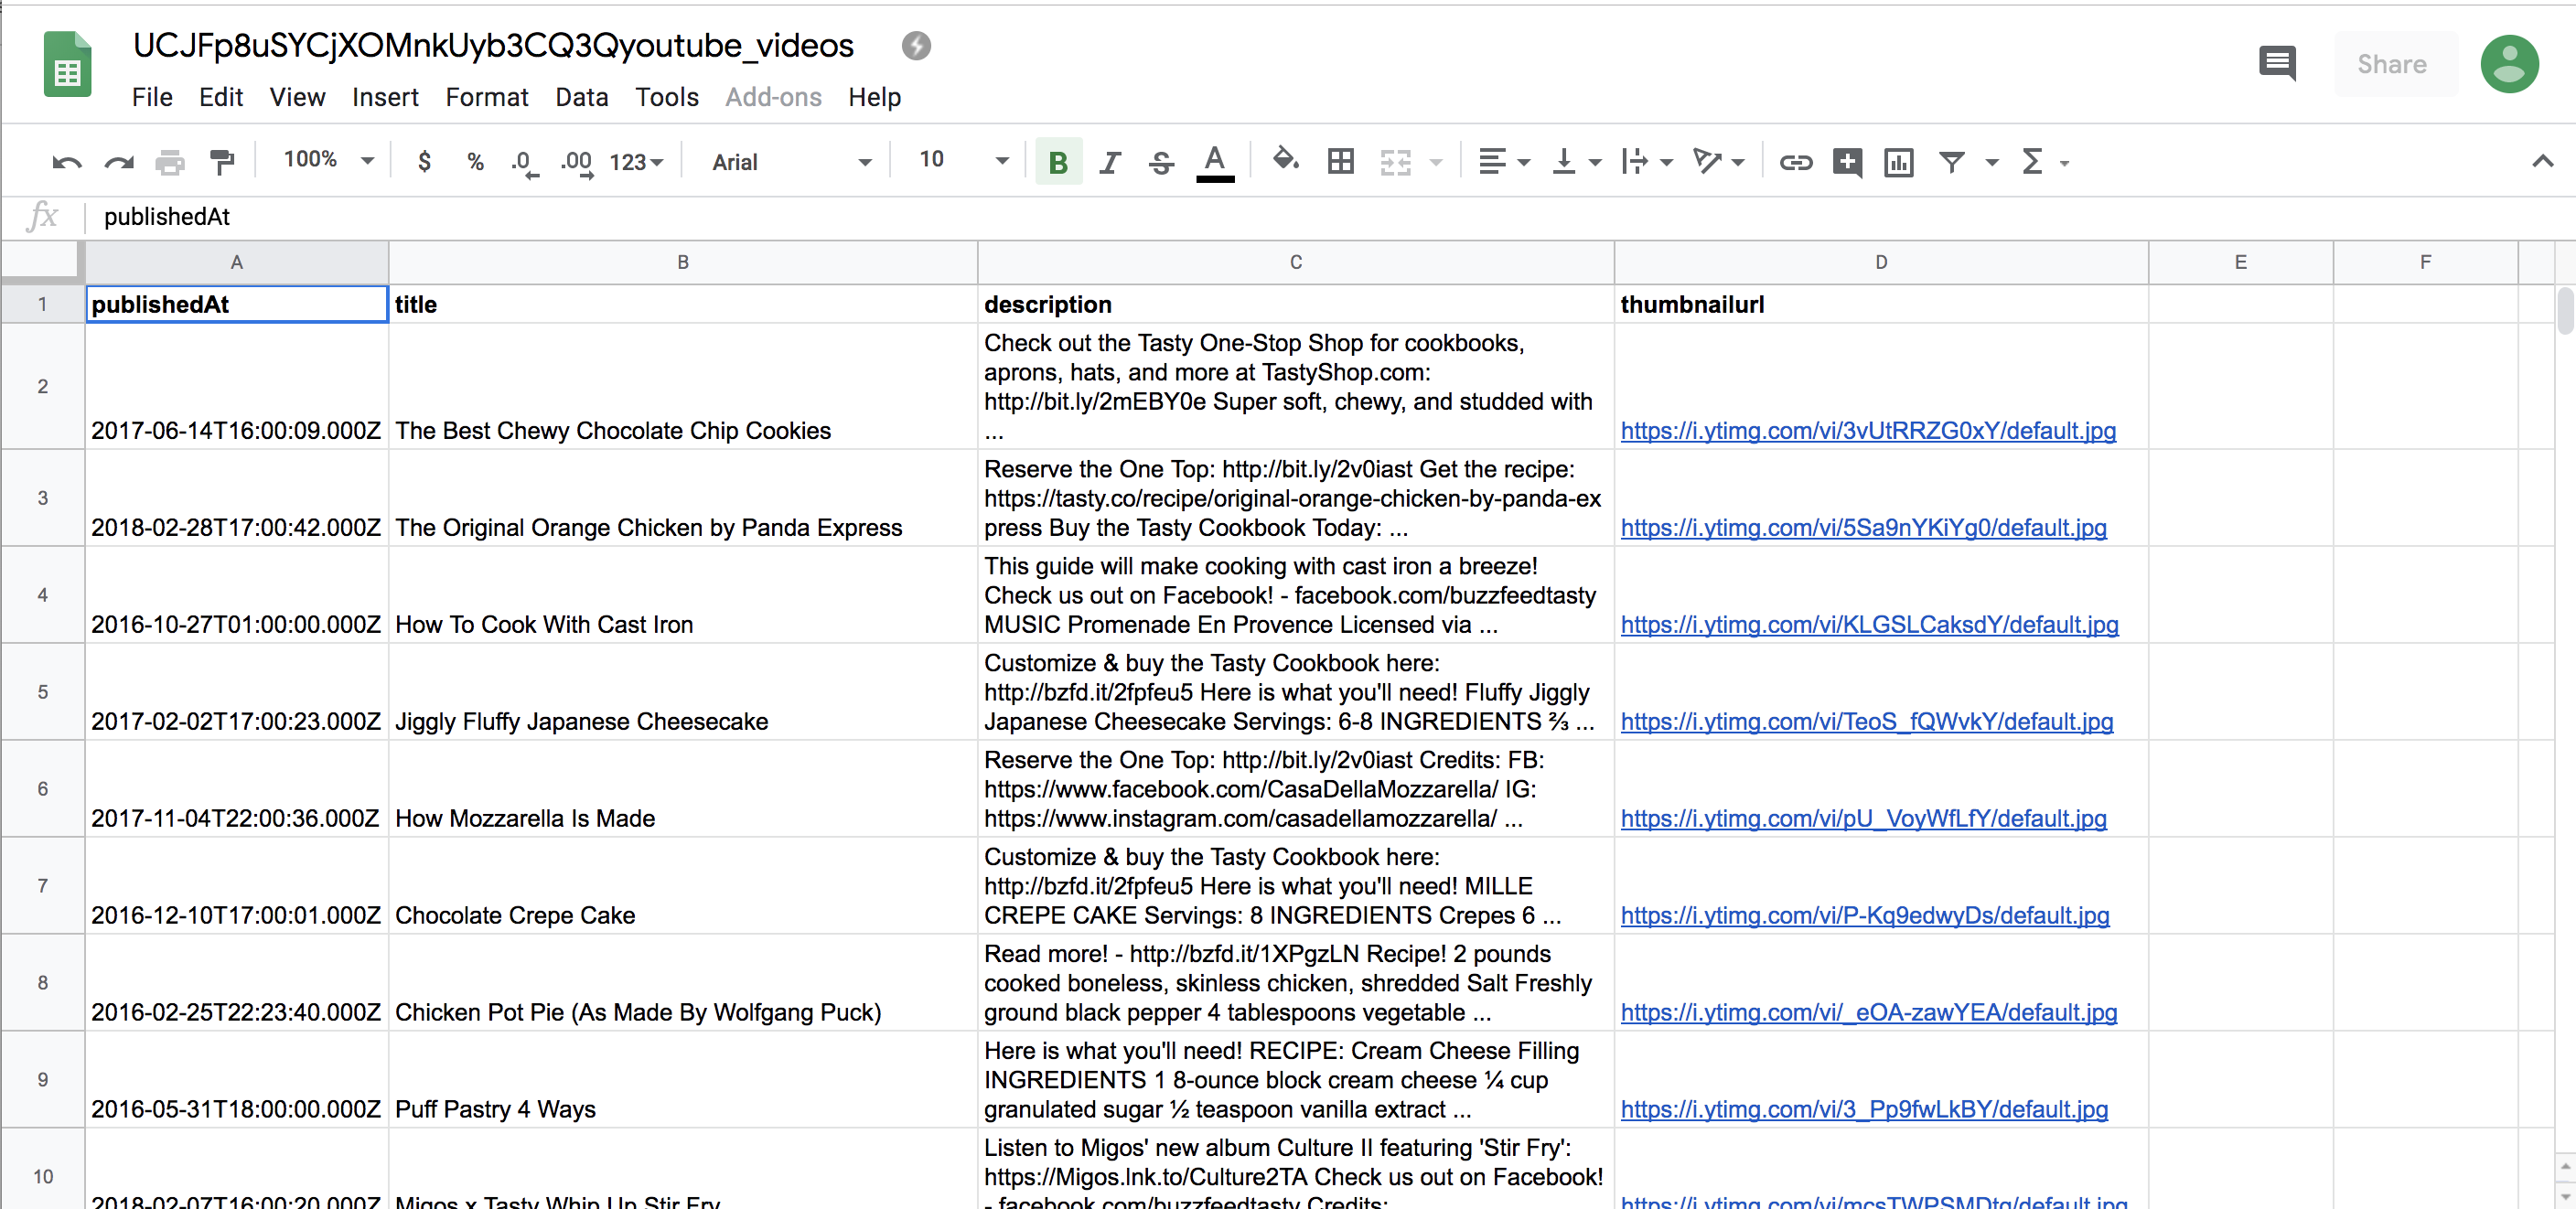
Figure 3-2: How our spreadsheet should look after being uploaded to a spreadsheet program like Google Sheets
While this script may work only with the YouTube API, it demonstrates the fundamental concepts you need to write a script that can harvest data from other platforms. Making a URL-based API call, reading and accessing JSON, and writing it into a .csv file are core skills that you’ll use repeatedly for many data-gathering and web development tasks.
Dealing with API Pagination
We’ve now touched upon some basic aspects of data gathering through one API call, but if you inspect the spreadsheet you just created you may notice that the .csv file contains data only for a handful of posts.
Welcome to the problems posed by the ubiquity of social media data! Because loading hundreds or thousands of YouTube videos can strain the site’s servers, we can’t request all of the data we want at once. Depending on how many data points we request, we could even crash a page or server. To keep that from happening, a lot of API providers build in ways to slow down the data-grabbing process.
YouTube limits the data we can request through pagination, which divides data into multiple JSON objects. Think of it like a phone book (from the olden days) that contains thousands of entries. Instead of having all the entries on one really long page, you can leaf through a book of multiple pages.
In this exercise, you’ll need to further explore YouTube’s JSON object. We have already tapped into one part, which we accessed with the “data” key by using posts[“data”]. If we look more closely at the JSON object we’ve been using, we’ll see a second key after all the post data called “paging”, which is shown in Listing 3-9.
{

 "kind": "youtube#searchListResponse",
 "etag": "\"XI7nbFXulYBIpL0ayR_gDh3eu1k/WDIU6XWo6uKQ6aM2v7pYkRa4xxs\"",
 "nextPageToken": "CAUQAA",
 "regionCode": "US",
 "pageInfo": {
  "totalResults": 2498,
  "resultsPerPage": 5
 },

 "items": [
  {
   "kind": "youtube#searchResult",
   "etag": "\"XI7nbFXulYBIpL0ayR_gDh3eu1k/wiczu7uNikHDvDfTYeIGvLJQbBg\"",
   "id": {
    "kind": "youtube#video",
    "videoId": "P-Kq9edwyDs"

   },

--snip--
Listing 3-9: The pagination data in the JSON object
When we run our script it only retrieves what’s on the page in the "items" key, so to access more results, we need to open the next page. As you can see in Listing 3-9, the API response renders more JSON data, which is accessible with the key “nextPageToken” and contains two more dictionaries.
To access the next page, we can use the token that is provided with the "nextPageToken" key. How do we use this value? Every API handles pagination differently, so we should consult the YouTube API documentation. We learn that to jump to the next page of results, we’ll need to add a new parameter to our API URL called "pageToken" and assign it the value provided with the "nextPageToken" key. Modify your script as shown in Listing 3-10.
--snip--

    csv_writer.writerow(["publishedAt",

                         "title",

                         "description",

                         "thumbnailurl"])

    has_another_page = True①

    while has_another_page:②

        if videos.get("items") is not None:

            for video in videos.get("items"):

                video_data_row  = [

                    video["snippet"]["publishedAt"],

                    video["snippet"]["title"],

                    video["snippet"]["description"],

                    video["snippet"]["thumbnails"]["default"]["url"]

                    ]

                csv_writer.writerow(video_data_row)

        if "nextPageToken" in videos.keys():

            next_page_url = api_url + "&pageToken="+videos["nextPageToken"]③

            next_page_posts = requests.get(next_page_url)

            videos = json.loads(next_page_posts.text)④

        else:

            print("no more videos!") has_another_page = False⑤
Listing 3-10: Modifying the script to gather data from other pages
First we introduce a variable called has_another_page, which we assign the value True ①. We’ll use this variable to check whether there’s another page where we can get data. This is a trick many developers use with conditional statements, like the if clauses we learned about in Chapter 1. The while statement ② is a type of loop that takes a conditional, like an if statement, and runs the code within it until the condition given to it is False. We’ll use the has_another_page variable in the while statement and switch it to False ⑤ when we’ve reached the end of our data stream and there are no pages left. The first few lines of the script are identical to the lines we wrote in Listing 3-8, except that we’ve now nested them in the while loop. The first time the while loop runs, it gathers data on the first JSON page just as it did before.
Once we’ve looped through each data object in the JSON on the first page, we check whether the JSON contains a value for a "nextPageToken" key. If no "nextPageToken" key exists, then there are no other pages for the script to load. If the “nextPageToken” key does exist, we’ll store the string of the videos[“nextPageToken”] link in a variable called next_page_url ③. This corresponds to the data item "nextPageToken": "CAUQAA", which we saw in Listing 3-9 under "nextPageToken". We’ll do another URL-based API call ④ with this URL and store the response in the posts variable. With the next page of posts loaded, we return to the beginning of our loop and gather the next set of post data.
This loop will run until we’ve reached the end of our JSON output (in other words, the end of our “phone book”). We’ll know that we’ve reached the last page once the API no longer displays a value for videos["nextPageToken"]. That is when we assign our variable has_another_page to False ⑤ and end our loop.
What we covered in this exercise is quite a bit for beginners to take in, so don’t worry too much if you need to reread it. The main concept to take away is that this is how paginations often work and how we as developers have to work around them: because data providers limit the amount of data we can get with each API URL, we have to programmatically “leaf” through the different pages of data we’re permitted to access.
Templates: How to Make Your Code Reusable
We’ve done what we came here for: we got our data—and a lot of it! But wait! Now we need to take an extra step and clean up our code in a way that makes it reusable. In other words, we want to template the code, or turn the script into a template that we can use over and over again.
What does that mean? Well, we’ll want a script that is not only reusable but also flexible enough to adapt to different kinds of scenarios. To template our script, first we look at which parts of it we may want to change when repurposing it.
What we want to potentially change are our credentials (if we want to give the code to someone else), the YouTube channel we want to access, and the kinds of data we want to gather. This is particularly helpful when we work on tight deadlines and often repeat tasks, or when we tend to experiment a lot with the kind of information we want to use for our research.
Storing Values That Change in Variables
One way we can make our code more flexible is by setting parameters as variables that we define at the beginning of the script. This way, all the changeable pieces of code are organized together in one easy-to-find place. Once we’ve defined each variable, we can then stitch them back together to form our API call. Take a look at Listing 3-11 to see how that would work.
--snip--

import csv
import json
import requests

channel_id = "UCJFp8uSYCjXOMnkUyb3CQ3Q"
youtube_api_key = "XXXXXXX"②
base = "https://www.googleapis.com/youtube/v3/search?"③
fields = "&part=snippet&channelId="④
api_key = "&key=" + youtube_api_key⑤
api_url = base + fields + channel_id + api_keyz
api_response = requests.get(api_url)
posts = json.loads(api_response.text)

--snip--
Listing 3-11: Templating the script for reuse
At the top we define two more variables: the channel_id that is associated with the YouTube channel of interest ① and the youtube_api_key variable to store our API key as a string ②. You can also see that we break up our API URL into individual parts. First, we define the base of our API, which will always be the same, and store it in the variable base ③. Then we enter the field parameters of the API as a separate string and store them in the variable fields ④. Next we concatenate the YouTube API key youtube_api_key into a string that we store in a variable called api_key ⑤.
Lastly, we stitch these pieces back together into one long string that makes up our URL-based API call z. This process allows us to modify parts of our API call in the future, in case we want to add other parameters to the query or use different credentials to access the API.
Storing Code in a Reusable Function
Another way we can template our code is by wrapping it into a function that we can call again and again, as shown in Listing 3-12.
def make_csv(page_id):①

    base = "https://www.googleapis.com/youtube/v3/search?"
    fields = "&part=snippet&channelId="
    api_key = "&key=" + youtube_api_key
    api_url = base + fields + page_id + api_key
    api_response = requests.get(api_url)
    videos = json.loads(api_response.text)

    with open("%syoutube_videos.csv" % page_id, "w") as csv_file:

        csv_writer = csv.writer(csv_file)
        csv_writer.writerow(["post_id",
                            "message",
                            "created_time",
                            "link",
                            "num_reactions"])
        has_another_page = True

        while has_another_page:
            if videos.get("items") is not None:
                for video in videos.get("items"):
                    video_data_row  = [
                      video["snippet"]["publishedAt"],
                      video["snippet"]["title"],
                      video["snippet"]["description"],
                      video["snippet"]["thumbnails"]["default"]["url"]
                    ]

                    csv_writer.writerow(video_data_row)

            if "nextPageToken" in videos.keys():
                next_page_url = api_url + "&pageToken="+videos["nextPageToken"]
                next_page_posts = requests.get(next_page_url)
                videos = json.loads(next_page_posts.text)
            else:
                print("no more videos!")
                has_another_page = False
Listing 3-12: Putting code into the make_csv() function
Here we wrap all of our code into a function called make_csv(), which takes the argument page_id. As we discussed in Chapter 1, a function is a way to lay out a series of steps in code that we can repeatedly run by calling the function later. First, we declare the make_csv() function and specify any arguments we want it to take ①, and then we enter all of the code we want to include in the function. Everything you want to include in make_csv() needs to be indented under the function declaration so that Python knows which code is part of the function. Now that we have defined make_csv(), we can execute it by calling its name and passing an argument in the function’s parentheses.
The final reusable script should look like Listing 3-13.
import csv
import json
import requests

channel_id = "UCJFp8uSYCjXOMnkUyb3CQ3Q"①
channel_id2 = "UCpko_-a4wgz2u_DgDgd9fqA"②
youtube_api_key = "XXXXXXX"

def make_csv(page_id):③
    base = "https://www.googleapis.com/youtube/v3/search?"
    fields = "&part=snippet&channelId="
    api_key = "&key=" + youtube_api_key
    api_url = base + fields + page_id + api_key
    api_response = requests.get(api_url)
    videos = json.loads(api_response.text)

    with open("%syoutube_videos.csv" % page_id, "w") as csv_file:
        csv_writer = csv.writer(csv_file)
        csv_writer.writerow(["publishedAt",
                            "title",
                            "description",
                            "thumbnailurl"])

        has_another_page = True
        while has_another_page:
            if videos.get("items") is not None:
                for video in videos.get("items"):
                    video_data_row  = [
                    video["snippet"]["publishedAt"],
                    video["snippet"]["title"],
                    video["snippet"]["description"],
                    video["snippet"]["thumbnails"]["default"]["url"]
                    ]

                    csv_writer.writerow(video_data_row)

            if "nextPageToken" in videos.keys():
                next_page_url = api_url + "&pageToken="+videos["nextPageToken"]
                next_page_posts = requests.get(next_page_url)
                videos = json.loads(next_page_posts.text)

            else:
                print("no more videos!")
                has_another_page = False
make_csv(channel_id)④
make_csv(channel_id2)⑤
Listing 3-13: The full template script
We use the variables channel_id ① and channel_id2 ② to hold the parts of the script that are most likely to change. Then we define the make_csv() function, which holds the code we want to run ③. Now we can run the function by passing the channel_id ④ and channel_id2 ⑤ variables into the make_csv() function. And that’s it!
There are two additional things to note. First, YouTube limits the amount of API calls per day one can make on a free account. This is known as a rate limit. With this kind of API call, we can only get a few hundred videos per channel, so if one channel has a lot of videos—more than we can get through a free account—we may need to use different API credentials to get data for the second channel. Secondly, the content produced online may include different kinds of special characters—emoji or characters in different languages, for example—that can be difficult for specific versions of Python to understand or, as coders say, encode. In those scenarios, Python may return a UnicodeEncodeError, a notification that Python encountered content that it has trouble reading and writing.
Note Unicode (https://unicode.org/) is a specification that aims to represent every character used in written human language, like a letter or an emoji, by assigning each its own code. Think of it as a lookup table for your computer.
While this was not an error I encountered when running our script on Mac computers, Windows computers seemed to have issues with encoding some of the content we tried to ingest through API calls. Since API calls return some of the latest data available from any given platform, each response to your API call will be specific to the most recent information from the API provider. This also means that, if you run into errors related to the content you’re trying to access through this API, you’ll need to find solutions closely tied to that particular content. To ensure you receive the right results, it might be helpful to specify an encoding method for the data you’re trying to collect. Listing 3-14 shows a small modification of the script that can help resolve issues for a few specific types of data.
--snip--

video_data_row  = [
    video["snippet"]["publishedAt"]
    video["snippet"]["title"].encode("utf-8")①,
    video["snippet"]["description"].encode("utf-8")②,
    video["snippet"]["thumbnails"]["default"]["url"].encode("utf-8")③

]
Listing 3-14: Modifying the script to help retrieve the right results
In this code, we add the .encode() function to three values that we’re accessing through different keys: the title, which we access with video["snippet"]["title"] ①; the description of a video, which we access with video["snippet"]["description"] ②; and the link for the video, which we access with video["snippet"]["thumbnails"]["default"]["url"] ③. Inside the .encode() function’s parentheses, we specify which kind of encoding method we want to use to better understand the data. In this case, we’re using a common encoding type called utf-8 (UTF stands for Unicode Transformation Format, and 8 simply specifies that we’re using 8-bit values to encode our information). Note that while this method may solve some encoding issues, since each error is specific to the content you’re trying to collect, it may be worth reading up on other potential solutions. (You’ll find a helpful tutorial at https://docs.python.org/3/howto/unicode.html.)
Having created our template code, we can use it for any YouTube channel we want. We can now run the make_csv() function for multiple pages or use different credentials. All we need to do is change the strings that are associated with the channel_id and channel_id2 variables or the youtube_api_key variable.
Templating your code is a great practice to follow after you’ve drafted a script that accomplishes your goals. This allows you to improve your code, repeat the tasks you’ve already programmed, and share your scripts with others who may be able to use them—we use other people’s code, so why not return the favor?
Summary
This chapter has shown you how APIs work and how to mine data from them using a script. APIs are an essential tool for gathering data. Knowing how to tap into them and how to modify a script is more important than the script itself. That’s because scripts can become outdated very quickly. The ways in which social media companies serve up data change all the time—they may implement new policies that restrict data access, the way Facebook did in 2015 by shutting down access to friends’ data. Or companies may just change the ways in which they allow users to interact with their API, the way Instagram did when it discontinued access to its photo streams in 2013.
To learn more about scripts, visit https://github.com/lamthuyvo/social-media-data-scripts, which has scripts for social media data gathering, instructions on how to use them, and links to other resources.
In the next chapter, you’ll see how to grab your data from Facebook and put it into a format your computer can understand.