Chapter 1: The Programming Languages You’ll Need to Know
Whether we’re talking about a Facebook post, a tweet, or a Yelp review, we need to understand how online platforms are structured in order to extract information from them. To do that, we need to learn the basics of coding and web development.
This chapter gives you an overview of how the web works with respect to web languages and within the context of our data mining efforts. Understanding how databases and web pages interact will help us investigate what kind of social media data is available online and how we can harvest it.
So where should we start? For beginners, the coding landscape can certainly be a little daunting (it definitely was to me!). It’s a world chock-full of acronyms, technical jargon, and multiple programming languages. Navigating all these languages can be overwhelming, so first let’s zoom out and look at the role they play.
Frontend Languages
Web languages can be broadly categorized into two groups: frontend languages and backend languages. We’ll begin this chapter by talking about the three frontend languages a web browser uses to read, interpret, and render the visual elements that we see in the browser window and on website tabs: HTML, CSS, and JavaScript. These languages are important for us to know because they contain the content we want to mine from social media websites.
Note Backend languages, which we’ll cover in the second half of the chapter, communicate with servers, databases, and data streams. They come into play when we want to harvest social media data by connecting directly to the computers that store that data.
How HTML Works
Much of the social media content we want to collect lives on websites, and websites are made up of HyperText Markup Language (HTML). HTML structures the text and images that make up a website’s content so that a browser can render, or display, that content for a user to view. The HTML code itself is just a text file, but when an HTML file is opened in a browser, it tells the browser to format and display content as a web page.
Web pages consist of files that end in a .html extension. The home page of most websites is index.html, so this is the file our browser usually looks for when we visit a website. These files usually live on a server, which is like a hard drive on a computer that is always switched on and is accessible by other computers through the internet. A uniform resource locator (URL) is a bit like an address to a folder on a server.
When our browsers go to a URL, they download lines of code that they then interpret and render in a visual form. A simple website could consist of only one line of code, like the one shown in Figure 1-1.
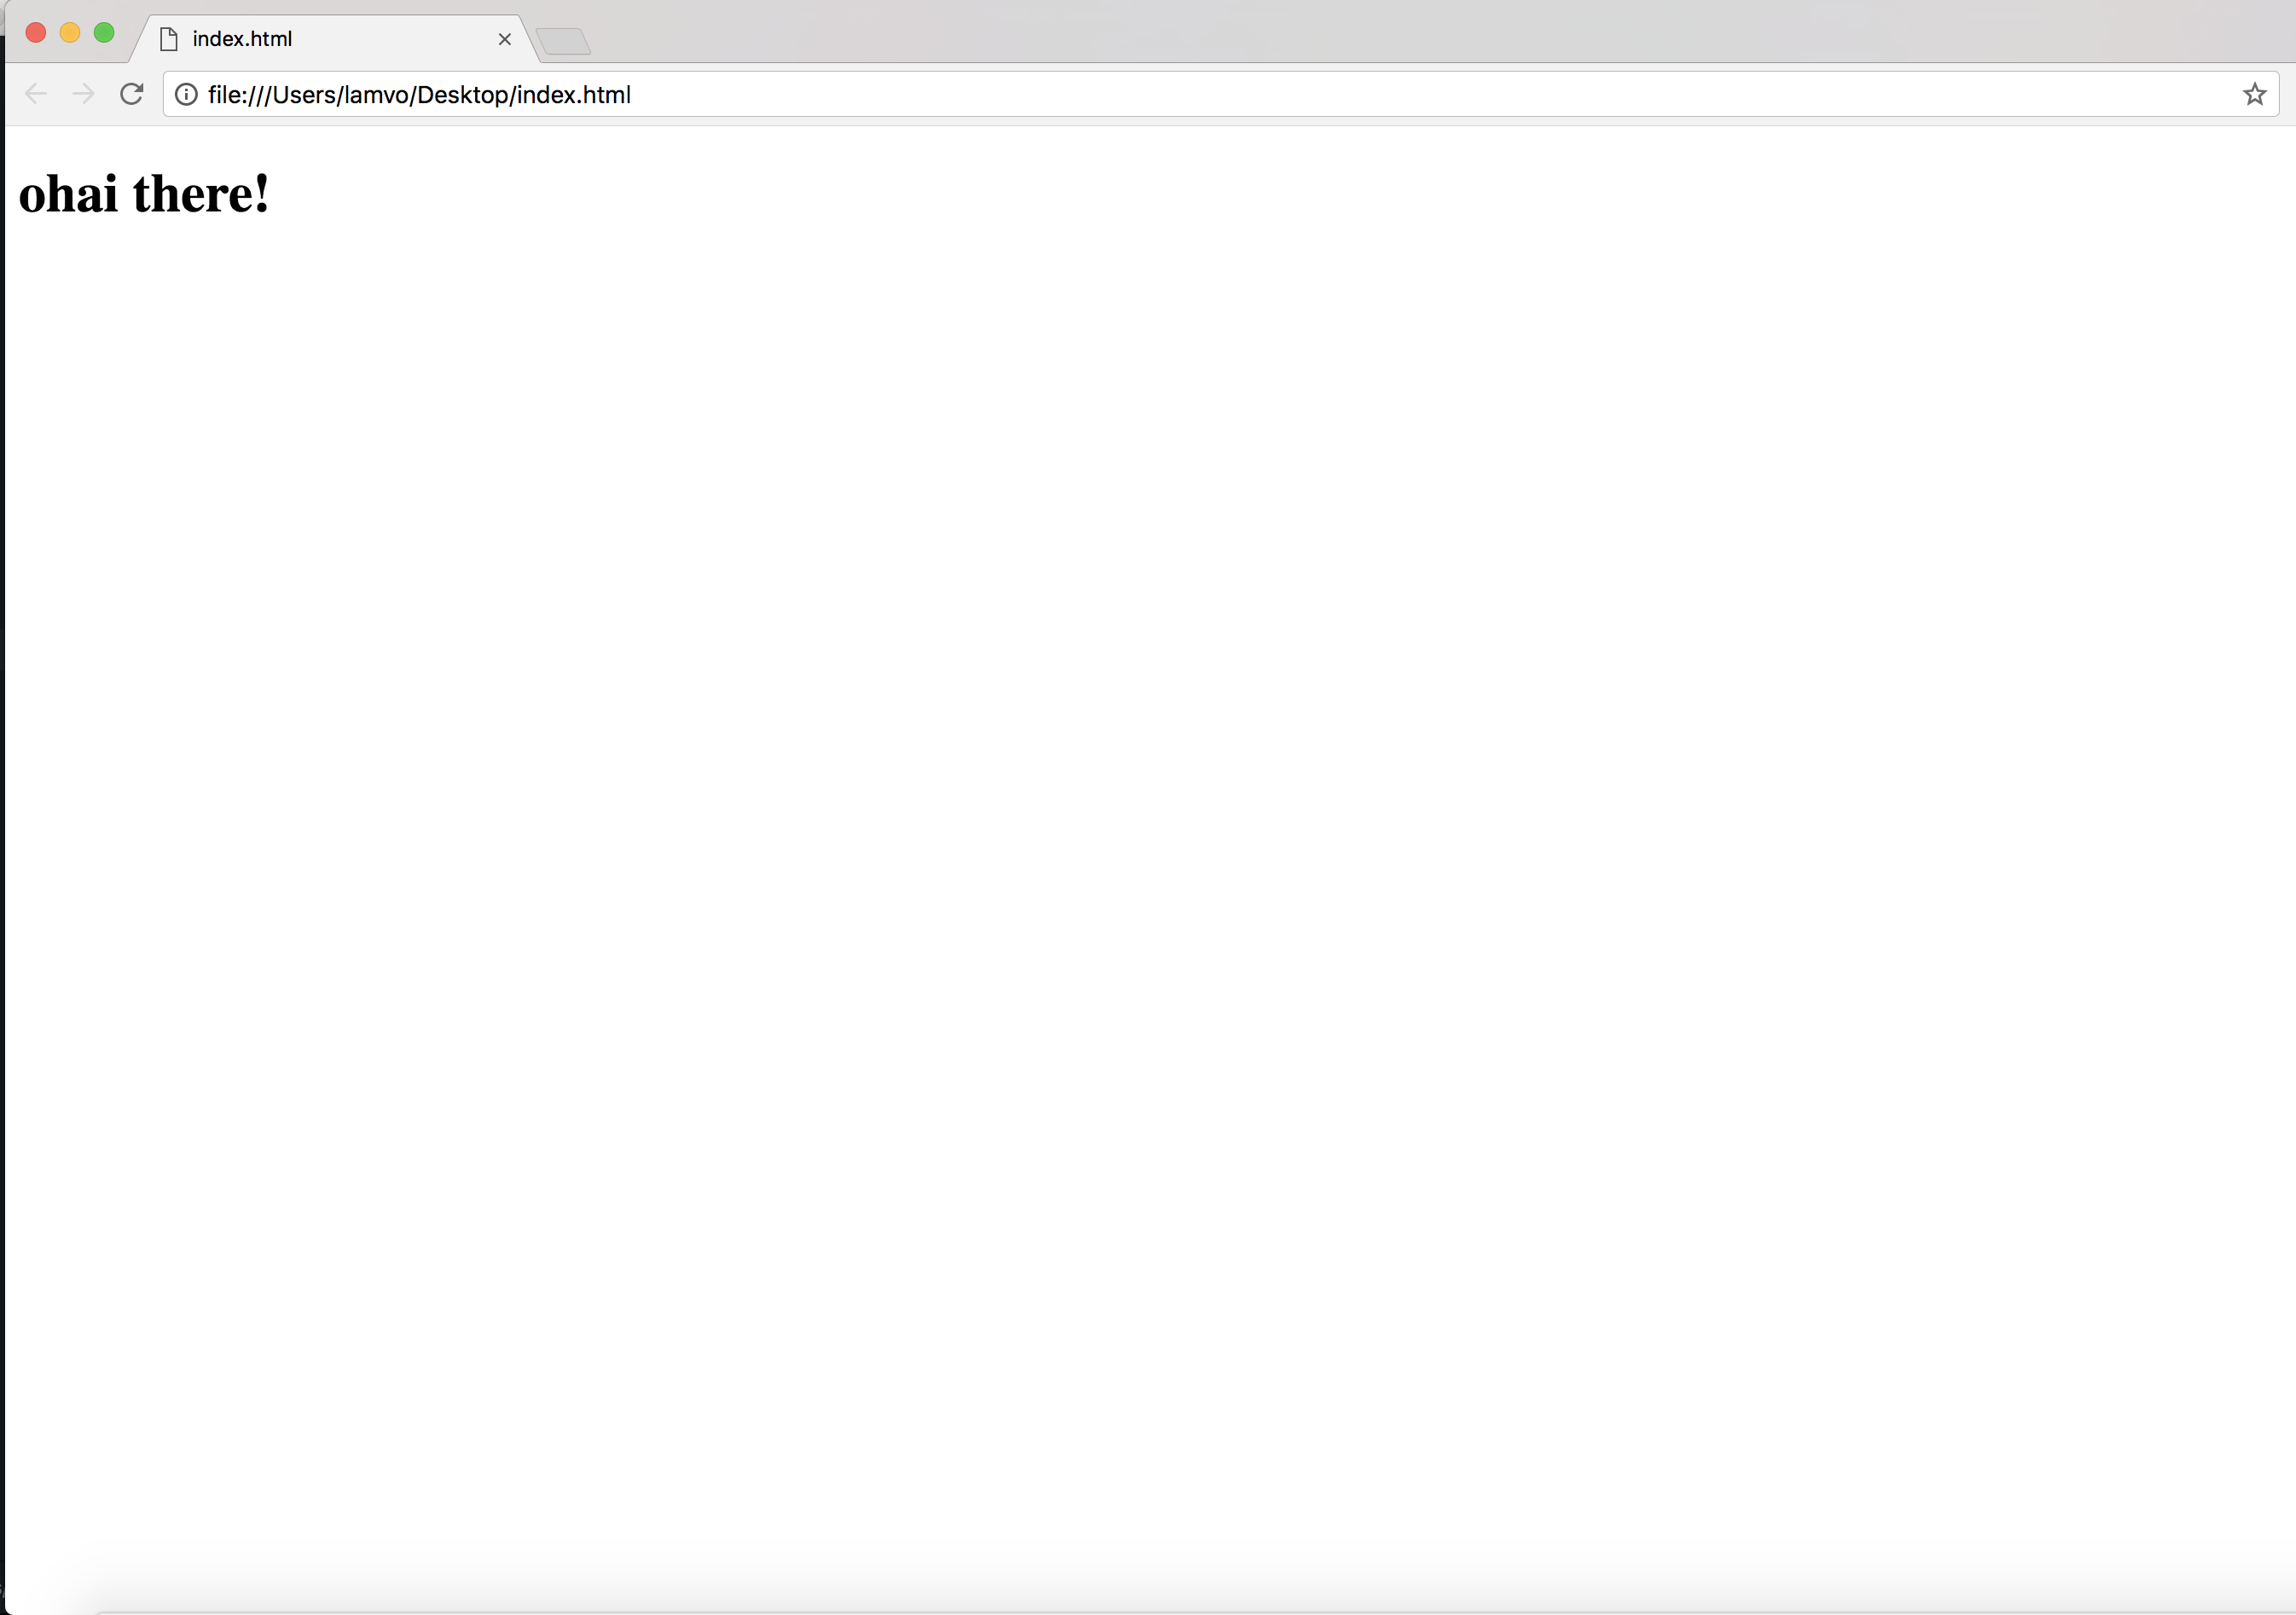
Figure 1-1: A very basic website
The code underlying that website looks like this:
<p> ohai there! </p>
In this context, the content is the sentence ohai there!. The two pieces of text surrounding the content are known as HTML tags.
The tags are a combination of text and angle brackets (<>) that tell a browser how each type of content should be organized. For example, the <p> and </p> tags in the code example tell the browser the sentence is a paragraph. Tags can also tell the browser whether content is a headline, an image, or another type of content. The tags and contents of the tags together are called elements. Each element typically starts with an opening or start tag, such as <p>, and ends with a closing or end tag, which is the same as the opening tag but with a backslash after the first bracket, such as </p>. The opening and closing tags hold content between them that will be rendered on the website. Some elements, like <img>, are called void elements and do not require a closing tag.
Figure 1-2 labels a basic HTML paragraph element.

Figure 1-2: An HTML paragraph element
When the element in Figure 1-2 is rendered in a browser, it will look like Figure 1-3.
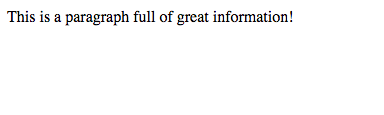
Figure 1-3: How the paragraph element from Figure 1-2 looks when opened in a browser
To summarize, HTML tags are a way to tell browsers how to structure content, while the information between the tags tells browsers what content should be rendered on the website.
HTML elements can also be nested, meaning a tag contains one or multiple other tags and their content. This feature is often used to cluster related elements. A header and a paragraph, for instance, may be nested inside a div element, which defines a division. Nesting the elements indicates that the header and paragraph inside the div element belong together. To show nesting, you usually use indentation—that is, add spaces or tabs in front of a line of code—which is optional but makes code more legible.
For example, we can place the paragraph element from Figure 1-1 into a <div> tag like so:
<div>

    <p>This is a paragraph full of great information!</p>

</div>
The entire paragraph element is now contained within the opening and closing <div> tags. To show that the paragraph element is nested, we’ve also put it on a line separate from the <div> tags and indented that line by four spaces. When rendered in a browser, the nested paragraph element should look like Figure 1-4.

Figure 1-4: The div and nested paragraph elements rendered in a browser
HTML ignores the indentation, and a div element is invisible when rendered. This means that the browser renders only the content inside the paragraph tags, and the element looks the same as it did in Figure 1-3.
Although you can’t actually see div elements and other invisible HTML structures in the browser, they’re useful because they organize a website into chunks. Think of the many parts that make up a tweet, for instance. Each tweet contains Twitter information on the person who posted it (their username, Twitter handle, and Twitter profile photo), a timestamp, the tweet text, the number of retweets for the tweet, and the number of favorites. Those parts are all clustered together in nested HTML tags. Nesting can become quite intricate, depending on how complicated a website is and how many elements are related to one another. Some nested elements may even be further nested inside other elements!
When you’re mining information from a website, it helps to know how content is structured within HTML elements and where the particular information you’re trying to find is located. We’ll revisit how to navigate nested elements to examine the HTML structure of a tweet a little later. First, though, we need to talk about CSS, which is deeply tied to HTML.
How CSS Works
All of our examples so far have been nothing but plain text, but websites are usually made up of more than that. For example, the text of a tweet may be a different font, color, and size than the text that displays the date and time when a tweet was published. You may be wondering how a browser knows to render HTML in different colors, fonts, and sizes. This is where Cascading Style Sheets (CSS) comes in.
CSS is what gives HTML files their colors, features, and (some may even say) character! CSS is the language that allows us to assign different types of HTML content a specific look and feel. You can think of CSS as a set of visual guidelines that tell the browser how each HTML element needs to look on a web page.
For example, it’s only through CSS that your page goes from looking like Figure 1-4 to looking like Figure 1-5.
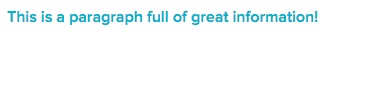
Figure 1-5: The div and paragraph elements rendered in a browser with CSS formatting
In the universe of social media data, CSS is often used to make sure that types of elements are rendered in a consistent way. On a timeline of tweets, for instance, every tweet timestamp needs to be rendered in the same font, color, and size.
There are various ways to assign CSS styles to an HTML tag. One method is through inline CSS, which assigns CSS in the same line where the HTML tag is created. You can see an example of this in Listing 1-1.
<div ①style="②color: #272727;">

    <p>This is a paragraph full of great information!</p>

</div>
Listing 1-1: Formatting an HTML <div> tag using inline CSS
In this example, an attribute is added to the opening tag of the div element. An attribute is additional information that is associated with each HTML tag. The attribute name goes after the opening angle bracket < and the tag name (in this case, div) and before the closing angle bracket >. The name is followed by an equal sign (=), and then by the attribute’s content, which is contained between double quotes (though HTML also accepts single quotes). Attributes generally are characteristics that are attributed to the tag in which they are located. Attributes are passed down to nested HTML elements. In this case, the div element has a style attribute ① in which we add inline CSS, meaning that now any content inside that <div> tag has to follow the CSS style rule defined in the style attribute. Since the paragraph element is nested inside the div element, the paragraph element and its contents inherit any styles that are assigned to the div.
CSS uses properties to change the colors, fonts, and other formatting options we can use on a website. Properties are similar to HTML attributes, but are formatted with a colon (:) separating the property name from the property’s value. For example, within the style attribute is the color property ②, which determines the color of our font. Websites use hexadecimal colors (for a tutorial, see https://www.w3schools.com/colors/), which represent colors as a combination of six numbers and letters. In this case, #272727 represents a dark gray.
Another way you can add CSS to HTML is by writing style rules in an internal style sheet. The style sheet is internal because the CSS is inserted directly into the HTML code between style tags, , but isn’t inline with the tags it’s formatting.
When you look at a website using an internal style sheet, you’ll find classes and IDs within those
Listing 1-2 shows an example of an internal style sheet that defines how to style a class and ID.
<style>

.my_styles①{

    color: #272727;

    font-size: 16px;

    font-weight: 600;

    text-shadow: 2px 2px #d8d8d8;

}

#my_div②{

    font-family: "Proxima Nova", Helvetica, sans-serif;

}

</style>

<div class="my_styles" id="my_div">③

    <p>This is a paragraph full of great information!</p>

</div>
Listing 1-2: Assigning CSS styling to HTML using an internal style sheet
Each style rule is located between the <style> tags. The first set of style rules is inside a class, which is started with a period (.) ① and the name of the class. In this case, the class is my_styles (note that there are no spaces in the name). The class name is followed by two braces ({ }), which contain the style rules for the class. In this case, you can see that our CSS specifies the color, font-size, font-weight, and text-shadow for any element the my_styles class is applied to. The next rule shown in the example creates an ID, which we call my_div ②. IDs are denoted by a hashtag followed by the ID name. The style rules for IDs are also contained between braces. The internal style sheet ends with a closing </style> tag.
Even though the CSS style rules are defined in this HTML, that doesn’t mean they’re applied to any HTML elements yet. In order to format HTML elements, you need to assign either the class or the ID to a tag.
To do this, we assign the “my_styles” class and the “my_div” ID to the <div> tag’s class and id attributes ③. This means that anything that is inside the div element is now styled according to both the my_styles class and my_div ID rules.
Figure 1-6 shows the look and feel that this CSS and HTML creates.

Figure 1-6: An inline CSS style sheet applied to the nested div element from Listing 1-2
Often, developers will write hundreds (if not thousands) of lines of CSS when designing a website. When style rules become complicated and plentiful, developers will often put them into a separate document called a style sheet, which they load inside their HTML pages through an external link tag like the following:
<link rel="stylesheet" type="text/css" href="css/mystyle.css">
CSS style sheets are saved using the .css extension and stored on a server. External style sheets are formatted in the same way as internal style sheets, except that you don’t need the HTML
This is a lot of information about making a website look beautiful. It may not seem relevant to our purposes now, but CSS is important because it helps us understand how a web designer might structure repetitive elements on a website. For example, if a designer uses a class to style all the headlines of Facebook posts in a particular way, it’ll be much easier for us to find each HTML element that contains headlines.
Now that you’ve seen the basics of how a website is designed and structured, let’s look at an example from Twitter that shows HTML and CSS in action.
How Tweets Are Structured in HTML and CSS
Let’s start by looking at a tweet from a Twitter timeline, shown in Figure 1-7.

Figure 1-7: An example of a tweet displayed on a Twitter timeline
Each item on the timeline represents a tweet, and each tweet has a subset of information attached to it. And, as you’ve probably gleaned by now, each tweet is rendered and organized using HTML and CSS.
While the browser renders neat visuals for users to see, there’s a lot more at play in this website than we may initially suspect. Let’s look under the hood to see what a tweet looks like as lines of code. To do this, we need to open up a nifty little browser feature called developer tools. These are tools that are built into some browsers, like Chrome, and are available as plug-ins for other browsers, like Firefox. We’ll go through this book’s examples using Chrome, a free browser you can download from https://www.google.com/chrome/.
Using Google Chrome, go to a Twitter timeline and click a single tweet. To access the HTML of the tweet in Chrome, select View>Developer>Developer Tools from Chrome’s menu or press ctrl-shift-I in Windows or command-option-I on a Mac.
This should open a second view in your browser called the Web Inspector. The Web Inspector allows you to look at the code underlying the website, as shown in Figure 1-8.
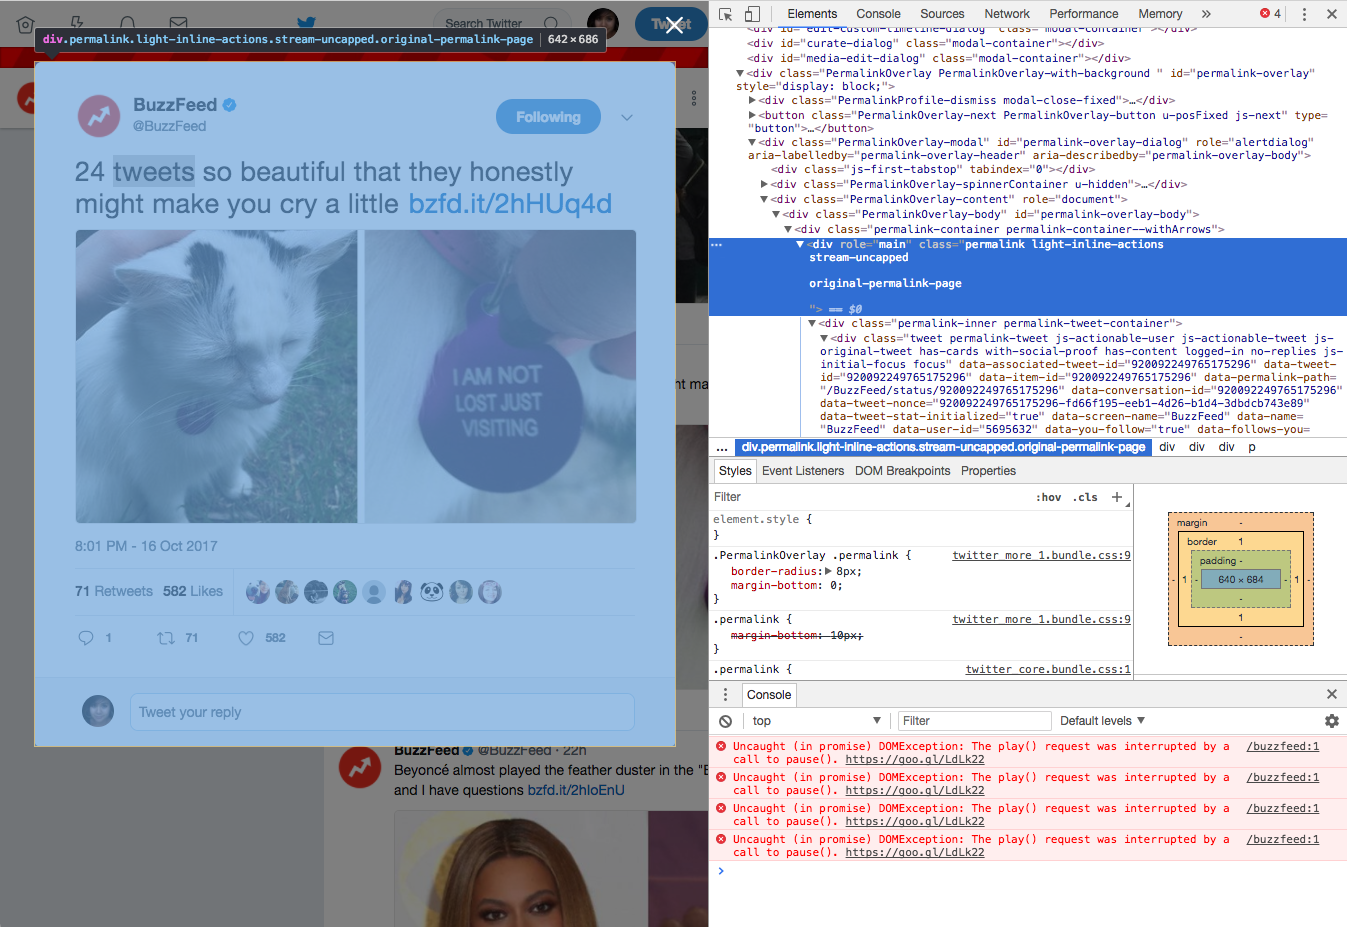
Figure 1-8: A tweet opened in the Web Inspector
Mouse over the code line by line. As you do so, Chrome should highlight the parts of the web page that correspond with the code you are mousing over. You can expand or collapse nested HTML by clicking the small triangles to the left of the HTML tags. The first few tags you mouse over will probably highlight the whole website, but for our purposes we only want to see the code that makes up a single tweet. When you do this on your own, you’ll need to drill down into each nested tag until Chrome highlights only the section of the website you’re looking for. For large and complex websites, this process might take a while.
For this example, we’re going to skip right to what we’re looking for. Click inside the Web Inspector (not on the web page!) and press ctrl-F on Windows, or command-F on Mac. A search bar should appear in the inspector window. Enter permalink-container into the search bar and press enter. You should be taken to a div class that highlights just the single tweet.
Now you can see that the tweet consists of a bunch of code nested inside a <div> tag that’s been assigned the class permalink-container. Notice that this code is made up of tags and classes like the simple HTML examples we’ve covered so far. Although real website data looks complex, the information is embedded in tags just as it is in simpler HTML code.
Let’s look at the tweet code more carefully. There’s a lot of information, but don’t worry! We’ll break it down and look at it one part at a time. Listing 1-3 shows a condensed (since there can be over 600 lines of code per tweet!) version of the tweet from Figure 1-8.
①<div class="permalink-container permalink-container--withArrows">
<div role="main" class="permalink light-inline-actions stream-uncapped original-permalink-page">
<div class="permalink-inner permalink-tweet-container">
②<div class="tweet permalink-tweet js-actionable-user js-actionable-tweet js-original-tweet has-cards with-social-proof has-content logged-in no-replies js-initial-focus focus" data-associated-tweet-id="920092249765175296" data-tweet-id="920092249765175296" data-item-id="920092249765175296" ③data-permalink-path="/BuzzFeed/status/920092249765175296" data-conversation-id="920092249765175296" data-tweet-nonce="920092249765175296-f30dd53d-6fe8-4553-9224-69186d43d82c" data-tweet-stat-initialized="true" data-screen-name="BuzzFeed" data-name="BuzzFeed" data-user-id="5695632" data-you-follow="true" data-follows-you="false" data-you-block="false" data-reply-to-users-json="[{"id_str":"5695632","screen_name":"BuzzFeed","name":"BuzzFeed","emojified_name":{"text":"BuzzFeed","emojified_text_as_html":"BuzzFeed"}}]" data-disclosure-type="" data-has-cards="true" tabindex="0">
<div class="content clearfix">
<div class="permalink-header">
<a class="account-group js-account-group js-action-profile js-user-profile-link js-nav" href="/BuzzFeed" data-user-id="5695632">
<img class="avatar js-action-profile-avatar" src="https://pbs.twimg.com/profile_images/687767655214891008/n9pHVYUl_bigger.png" alt="">
<span class="FullNameGroup">
④<strong class="fullname show-popup-with-id " data-aria-label-part="">BuzzFeed</strong><span>‏</span>
--snip--
</div>
Listing 1-3: The HTML making up a single tweet
Each tweet lives in a structure like this on Twitter, and by the end of this book, you’ll be able to use code to automatically pull out the information you need from hundreds or thousands of these structures. The HTML in this example is complicated and confusing at first glance, but you can make sense of it by looking at it piece by piece.
For example, the <div> tag with the class permalink-container is the HTML tag that encases the entire tweet ①. Nested within that tag is a <div> with the class tweet ② and some information that is related to the tweet but not displayed. Some of that information is labeled with an easy-to‑understand name like data-follows-you, which tells the browser whether the owner of the tweet is following your Twitter account. Other information, like the data-permalink-path ③, has an opaque name you’ll need to figure out through some detective work. In this case, the data-permalink-path is the link that goes at the end of the tweet’s https://twitter.com/ URL. At the end of this code snippet is a tag, which makes text bold, that is assigned the class fullname ④. The content of the tag is the Twitter account name, BuzzFeed.
While the code initially looked overwhelming, by combing through it carefully we have found important information that is connected to the tweet. The same is true of much of the data we’ll mine from social media.
How JavaScript Works
HTML and CSS are directly relevant to our data gathering because they are closely related to the social media content we’re interested in grabbing, but there are a few other moving parts involved in a website, such as JavaScript.
JavaScript is the programming language that brings interactivity to a website and can manipulate the elements rendered on a page. It allows us to dynamically change a website before or even after it has been rendered. In other words, with JavaScript we can change attributes or properties of HTML and CSS, or even create HTML elements on a page.
Let’s see how this works by using JavaScript to change the color of the paragraph in Listing 1-4.
<div class="my_styles" id="my_box">

    <p>This is a paragraph full of great information!</p>

</div>
Listing 1-4: A paragraph nested in a div
In a browser, this code would render as Figure 1-9.

Figure 1-9: A paragraph with some styles applied
The code in Listing 1-4 contains a <div> tag that’s been assigned a class called my_styles and an ID called my_box. Using JavaScript, we can select the paragraph’s HTML tag using either its class or its ID. Once we have the tag’s class or ID, we can assign the tag a new class or a new style using JavaScript.
Let’s add some JavaScript to the code from Listing 1-4 that selects our HTML element using the ID my_box, as in Listing 1-5.
① <div class="my_styles" id="my_box">

    <p>This is a paragraph full of great information!</p>

</div>

② <script type="text/javascript">

        ③document.getElementById("my_box").style.color = "red"

</script>
Listing 1-5: Using JavaScript to select an element by ID and modify its color
JavaScript must go between
While you may not know how to read JavaScript, you can often decipher quite a bit simply by reading it. Let’s try walking through the JavaScript at ③ one piece at a time. First we’re looking through the document. Then we’re using a part of JavaScript called getElementById(), which tells you exactly what it does—it gets an element according to its ID! In many programming languages, when code appears with parentheses, the part outside the parentheses acts on the content inside the parentheses. In this case, my_box is inside the parentheses, so we’re telling getElementById() to act on my_box. This grabs the div element with the my_box ID at ①. Then, we give the div we just grabbed a new CSS style and color. In this case we are applying the style “red”.
Through this piece of JavaScript, we have now changed the color of the text that is rendered in the browser so it looks like Figure 1-10, where the darker gray represents a red text color.

Figure 1-10: A style applied to a div using JavaScript
That is the basic way in which JavaScript works. You won’t need to know how to write JavaScript for this book, but you should understand that it’s a vastly important part of web pages and it’s capable of changing a website’s content, including the content we’re looking to gather from social media websites.
Backend Languages
As you’ve seen, a lot of the data we’re interested in is in plain sight when we inspect the code of social media websites, but there are other methods of obtaining data that are invisible to everyday users. These methods are developed for and geared toward programmers, so in order to access them, you’ll need to become a programmer, too. In order to do that, you’ll need to learn a backend language.
Backend languages can create, update, and communicate with databases that are stored on servers. You can think of a server as a hard drive that you access through the internet: it’s a big physical drive that contains a bunch of information, including the databases full of social media data and all the HTML and CSS files that make up the websites we can view online. Backend languages also allow you to create files like a text file or a spreadsheet on your computer and write your data directly into those files.
Using Python
Throughout this book we’ll use Python as our backend language to both gather and analyze data. Python is an open source programming language, meaning it is developed by an active community and offered to developers to use for free, even for commercial purposes. It is regularly updated and comes in several versions. We’ll be using the latest version: Python 3.7.
The lessons in this book are not designed to make you an expert in Python, but rather to help you understand basic coding concepts, how the language works, how to read and comprehend existing scripts (which are text files containing code), and how to modify code for your own needs. In other words, you won’t be building fancy apps and writing complicated scripts in Python after reading this book, but you’ll know just enough to be ”dangerous” and build scripts for your own purposes.
Whether you have Python on your machine or not, you should download and install Python 3, the latest version, through Python’s official website (https://www.python.org/downloads/).
Getting Started with Python
In order to use Python for our purposes, we need to understand basic coding concepts, so the next few exercises are constructed to introduce you to several of these. Think of each exercise as a vocabulary or grammar lesson that will get you one step closer to writing a complete “sentence”—in this case, a functional line of Python code.
For these exercises, you’ll need to enter lines of code into an interactive shell, which is an interface that can read and understand Python. First you’ll need to open a command line interface (CLI), a program on your computer that allows you to run commands. On Macs, you’ll use the Terminal, which is available from the Applications folder. On Windows, you can use the Command Prompt, which is available through the Start menu.
Open your CLI and enter python3 on Mac or python on Windows. That should open your interactive shell. You’ll know your interactive shell is open if you see the prompt, which looks like three angle brackets (»>), as shown in Figure 1-11.
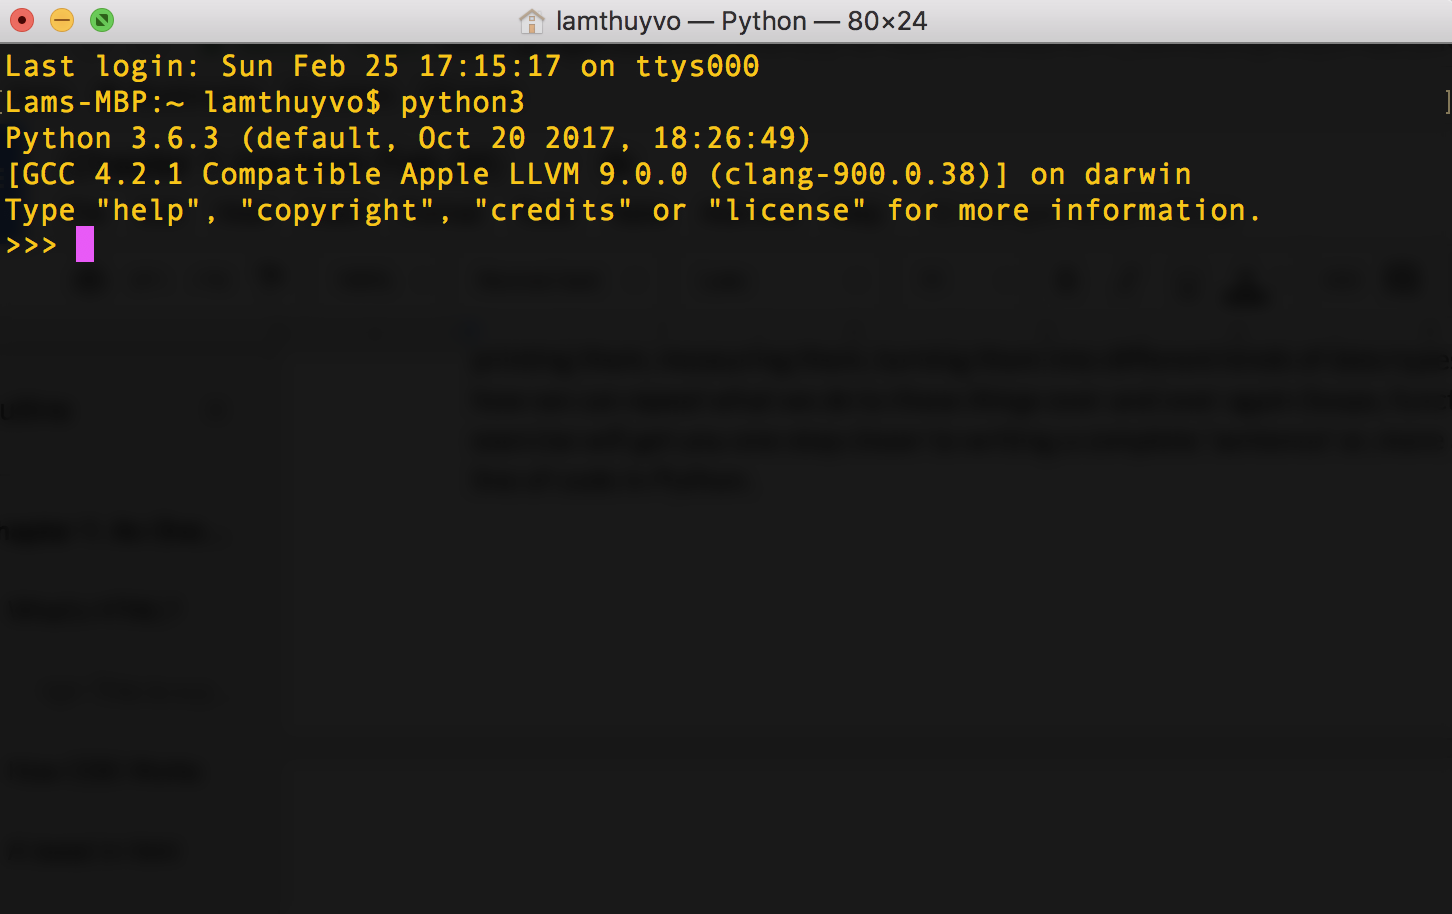
Figure 1-11: An interactive shell accessed through Terminal, Mac’s built-in CLI
Now your CLI window knows how to interpret Python code. Start by entering the following simple command and hitting enter:
>>> print("hello!")
Congratulations! You just wrote your first line of Python. You told your interactive shell to print out the text hello!, which should now be displayed right after the command you entered, like this:
>>> print("hello!")

hello!
The command you entered, called a print statement, prints the quoted text you enter between the parentheses.
On top of being able to print out text, Python can also do math, so let’s give that a try. Enter this equation into your interactive shell:
>>> 5 + 4

9
In Python, the mathematical equation is called an expression, which is a line of code that allows us to modify values using operators. Expressions are one of the most fundamental concepts in programming: they let you modify things like these numbers into something different.
In this example, we took two values—5 and 4—and modified them through a mathematical operator, which performs an operation on values. In this case, the plus sign (+) is the operator.
Each value has a type associated with it, referred to as a data type. Data types are categories of information. For example, a number could be one data type, while text would be another. Each data type is treated differently by Python, and not all operators will work with all data types, so you’ll need to be able to distinguish between them.
You’ll use several data types in Python, including integers to represent whole numbers such as 1, 2, 3, 4, 5, and so on. You’ll also use floats, which are numbers that contain decimals like 1.2 and 3.456. When you need to use text, you’ll use strings, characters that are “strung” together. Strings are contained between double quotes (“) or single quotes (‘). Strings can include alphabetical characters, numbers, spaces, and other symbols. For example, “Lam”, ‘Lam is a writer’, and ‘123567’ are all strings.
Working with Numbers
Python offers a number of math operators. As you’ve seen, there’s the plus sign (+), which adds values on either side of the sign to one another, but you’ll also find other math operations you’ve used in school.
For example, the minus sign - subtracts the value on the right side from the one on the left:
>>> 2 - 1

1
In addition to the plus and minus operators, you’ll find some familiar operators that use unfamiliar symbols. For example, multiplication in math class uses the × multiplication symbol, but in Python, you’ll use the asterisk ( * ) instead:
>>> 2 * 3

6
Similarly, division uses another unfamiliar sign, the forward slash (/), and results in a float:
>>> 6 / 4

1.5
Python has several other operators for numbers, but let’s move on to modifying other data types for now.
Working with Strings
Instead of using Python to modify integers and floats, let’s try to modify some strings. Go to your interactive shell and enter:
>>> "Hello, my name is " + "Lam"

'Hello, my name is Lam'
Yay! We just combined two strings into one string using the string concatenation operator (+). Concatenation is the act of combining things together.
Although the string concatenation operator uses exactly the same symbol as the addition operator for adding numbers together, they’re different because they operate on different data types.
Anything that is between two double quotation marks or two single quotation marks is a string, even if it looks like another data type, like a number. For example, if we add a number between two quotation marks to another number between two quotation marks, Python will not perform math on them, but rather create a new string from them:
>>> "5" + "4"

'54'
The string “5” isn’t the same as the integer 5, and likewise with “4”, which is a string. When these two values are operated on by the plus sign, they’re concatenated rather than added. Make sure you have a good grasp of the different data types, since you’ll get errors if you use them improperly. For example, if you tried to use the plus sign on a string and an integer, like “5” + 4, you’d get an error, since Python wouldn’t know whether you’re using the addition operator or the string concatenation operator.
Note that Python accepts either single quotes or double quotes interchangeably to denote strings, but be sure you’re consistent: if you start a string with a double quote, you must end it with a double quote. The same goes for single quotes. In general, it is best to pick one convention—double or single quotes—and stick with it throughout a script.
Storing Values in Variables
Now that you’ve seen how expressions let you modify values, we’ll move on to another important concept: variables. Variables are a way to store values like integers, floats, or strings. Imagine a variable as a labeled box. Once you put your values inside that box, you can refer to them using the label. You can also change the values inside your box and replace them with other values. Putting a piece of data into your variable “box” is referred to as assigning a value to a variable.
To create a variable, give it a name. This name should be descriptive, in the same way you’d label a box full of pots and pans “kitchen utensils” instead of “stuff.” You can name your variable nearly anything in Python, but the name can’t have spaces and can’t already be in use. For example, you can’t have two variables with the same exact name, and you can’t use names that could be confused with other Python code, like a plain number that could be mistaken for an integer.
Once you’ve settled on a name for your variable, you use the assignment operator, which is an equal sign (=), to store a value in it.
For instance, to assign the string “Lam” to a variable called name, you enter name, the assignment operator, and then the value you want to assign, “Lam”, in your interactive shell like so:
>>> name = "Lam"
You have now told the interactive shell that the variable name stores the value “Lam”. Unlike in our earlier examples, you shouldn’t get any output here.
To print out the value stored within the variable name, you enter the variable name in the print() command instead of the string value:
>>> print(name)

Lam
The variable name stores “Lam”, so the print() command simply outputs the string value.
We can use variables in the place of the string value in expressions, too, as in the following code:
>>> "My name is " + name

'My name is Lam'
Python takes the string “My name is “ and concatenates the value stored in the name variable to it.
We can also change what we store in a variable by assigning it a different value. Let’s see how this works one step at a time:
>>> name = "Lam"

>>> "My name is " + name

'My name is Lam'

>>> name = "Rosa"

>>> "My name is " + name

'My name is Rosa'
In the first line, we assign the string “Lam” to name. Then we print it out in an expression, which results in the string “My name is Lam”. Next, we assign name the value “Rosa” so that Python will store the new value in our variable. If we use the same print() command we used earlier, Python will use the currently stored value and print “My name is Rosa”.
What’s also great is that we can store numbers in variables and perform math in them:
>>> initial_age = 10

>>> time_passed = 20.5

>>> initial_age + time_passed

30.5
First we assign the integer 10 to the initial_age variable. Then we assign the float 20.5 to the time_passed variable. In the third line, we add the value assigned to initial_age to the value assigned to time_passed by using the plus sign. Since we’re adding two numerical values that are stored in the variables initial_age and time_passed, the result is 30.5.
As you can see in these examples, we can assign different kinds of data types to a variable—a variable can hold strings, floats, and integers. Variables play a big role in gathering data points or values from the social web. For example, we can gather each data point from a website, temporarily store it in the appropriate variable, and then write each data point into a spreadsheet.
Storing Multiple Values in Lists
In addition to storing one value, a variable can also hold multiple values in the form of a list. A list is a Python data type that can hold multiple other data types. To create a list in Python, you enter the values you want to store in the list, separated by commas (,) and in between two brackets ([ ]). Try making a list in the interactive shell as shown here:
>>> ["Lam", "Rosa"]

['Lam', 'Rosa']
You can also store a list in a variable by assigning the variable a list value just as you would assign it a string value. In the interactive shell, create a list as follows:
>>> names = ["Lam", "Rosa"]
To print the list, use the print() command:
>>> print(names)

['Lam', 'Rosa']
Lists can also be a great way to handle different data types, like a mix of integers and strings:
>>> numbers = [0, 2.6, 7]

>>> tweet_statistics = [536, 301, "New York"]
As you can see, the first variable numbers stores a list of integers and floats (0, 2.6, and 7), while the second variable tweet_statistics stores a list of integers (536 and 301) and a string (“New York”).
Lists of different data types can be very useful when we’re harvesting different kinds of data from the social web. For example, we may want to store Twitter handles of people who have favorited a tweet as a list. We could also store statistics related to a tweet in a list. The list of values stored in the variable tweet_statistics, for instance, could represent the number of favorites (536), the number of retweets (301), and the location (“New York”) associated with a tweet.
Whichever type of data we’re looking at, lists are likely one way we’ll use to store it. Being familiar with lists can help us tremendously when we start gathering data.
Working with Functions
In the previous exercises, we learned that Python has transformative powers. Through expressions we can access and modify data. That, in itself, is hugely powerful, but what’s even more powerful is Python’s ability to repeat actions more quickly than a human ever could.
Imagine trying to count the number of posts that a Facebook page has published. It’s one thing to manually count every post for a single page, but imagine having to count the total number of posts published by 10, 100, or maybe even 1,000 Facebook pages—that could take you hours, days, or even weeks! If you were to write a Python script once that counts the posts of a page, you could reuse that same script to count the posts of any number of pages and, better yet, Python would be able to count the posts nearly instantaneously compared to what you could do manually.
To take advantage of this ability, we need functions. Functions are like a set of instructions that can be executed over and over again, like a recipe.
For example, imagine making an apple pie. You might not need directions to make an apple pie if you were making just one by yourself, but if you had to make a dozen apple pies and needed help from other people, you’d probably want to write the instructions down. That way, no matter how many helpers you have, they could follow the instructions and you wouldn’t have to explain the recipe to each person individually.
Functions are like the set of directions you’ve written down. Once you have that set of instructions, you can execute the function however many times you want and you can have other programs follow the directions, too.
To execute a function, you write out the name of the function followed by opening and closing parentheses. Within the parentheses, you specify which value or variable should be modified by the function. The data you put inside the function’s parentheses is referred to as an argument. For example, the print() command we’ve been using is a function whose name is print, which takes strings as arguments between its parentheses.
We’ll start by discussing Python’s built-in functions. When we install Python on our computer, there’s a set of functions that have been developed and baked into Python by the many people who create and maintain it. Those are functions we can use right away, like the print() command.
Another one of these built-in functions is len(), which measures the length of a value. For example, we can use len() to measure the length of a string like this:
>>> len("apple pie")

9
This code counts the number of characters, including spaces, in the string. When we execute the function, which is also referred to as calling the function, it returns the integer 9, meaning there are nine characters in the string.
We can measure the length of a list of values, too. Let’s make a list called apples and use the len() function to count how many items are in the list:
>>> apples = ["honeycrisp", "royal gala"]

>>> len(apples)

2
In this case we have two items in our list that are both strings: “honeycrisp” and “royal gala”. When we call the len() function on apples, then, it returns the integer 2.
Built-in functions cover a lot of the basic tasks in Python. For a longer list of built-in functions, the Python community has put together a useful page at https://docs.python.org/3/library/functions.html.
Creating Your Own Functions
To create our own function, which is referred to as declaring a function, we enter the following in our interactive shell:
>>> def write_sentence(word):

        new_sentence = word + " is my favorite kind of apple."

        print(new_sentence)
To define our function, we use the keyword def, which signals to Python that we’re about to write a function. Then we define a name for the function—in this case, write_sentence—and add parentheses directly after it. If we want the function to modify an argument, we enter an argument name inside the parentheses. We’ll use the argument name to refer back to the object we want to modify within our function.
The colon (:) signifies that everything in the following indented lines is part of the function. In web languages like HTML, indentation is optional, but in Python, indentation is meaningful and required. Indentation, which we implement by using either the tab key or four spaces at the beginning of a line, tells Python which parts of the code are grouped together.
Python will associate everything that is indented with the function’s instructions until it encounters a line of code that is unindented. Once Python encounters an unindented line, it knows it’s reached the end of the function and moves on to the next part of the code.
Within the indented code, we define a variable named new_sentence and then put together a new string using the plus sign and the string “ is my favorite kind of apple.”. We store the result of this expression in the variable new_sentence, then print new_sentence.
Defining a function isn’t the same as calling a function. Remember a function is like a recipe, so defining a function is like writing the recipe down. But without executing the steps of your recipe with actual ingredients, we won’t have a meal to enjoy! So, last but not least, we need to call our new function by passing it an argument to modify.
Let’s pass our write_sentence() function the “honeycrisp” string as an argument:
>>> write_sentence("honeycrisp")

honeycrisp is my favorite kind of apple.
The power of functions is that we can execute the function not just for one string, but for any other string. Next we run the function two times, each time using a different string as the argument of our function:
>>> writesentence("royal gala")

royal gala is my favorite kind of apple.

>>> writesentence("granny smith")

granny smith is my favorite kind of apple.
As this example shows, we can make a new sentence over and over again using our function with different strings.
We have now discovered the power of functions—a set of instructions that can be reused multiple times. However, even though you can now create a function to execute on demand, calling the function in every instance you want to use it can still be a chore, especially if you need to use it hundreds or thousands of times. Next you’ll learn about another concept that will allow you to automatically run code multiple times: loops.
Using Loops
Loops allow us to perform actions multiple times. For our purposes, we’ll use loops to go through a list and perform an action for each item. To do this, we’ll use a for loop.
To illustrate the power of loops, let’s revisit our apple pie recipe. Imagine we have four apples and we need to peel every single one. If we had a robot that could help us with our chores (the future is nigh!), we could write a for loop that instructs the robot to go through our bucket of apples and peel each one. We might give our robot helper an instruction like this: for each apple in our bucket of apples, peel the apple!
In actual robot language (Python), we have to follow a formula to create a for loop. The construction looks more like this:
for apple in list_of_apples:

    # This is where we would specify what our robot would do
Let’s run through a working Python example to see how this formula works. First, we need to define the list we want to loop, or iterate, through. Then, we need to declare a for loop by telling Python what list to loop through:
>>> apples = ["honeycrisp", "royal gala"]

>>> for apple in apples:

        new_string = "I'm peeling the " + apple

        print(new_string)

I'm peeling the honeycrisp

I'm peeling the royal gala
As we did earlier, we first define our list of apples—in this case, two strings. Then comes our for loop. To iterate through each item in the list, we need to temporarily store the item in a variable. We do this by storing each item in our apples list inside the variable apple one at a time. We’ll see how this works soon.
Similar to a function, a for loop is often followed by a set of instructions. It will execute these instructions for every item in our list. Like functions, for loops also use a colon to tell Python when the instructions start, and indentation to tell Python which code belongs to the loop.
In the loop, we concatenate the variable apple to another string and store the resulting string in a variable called new_string. Then, we instruct our code to print the new string we just created.
The for loop executes the same instructions for each item in the list one at a time, so the interactive shell prints out two new strings. First, the for loop assigns the apple variable to the first item in the apples list, so apple is the string “honeycrisp”. Then, the for loop executes the code inside of it, which prints the first string, “I’m peeling the honeycrisp”. This is one iteration of the for loop. Once the for loop has finished its first iteration, it checks if there are more items in the apples list and, if there are, it assigns apple to the next item. In this case, that’s the string “royal gala”. Then, the for loop runs the code inside it again, which prints “I’m peeling the royal gala”. This is the second iteration of the loop. The for loop will continue down the list of items and run the code for each item until it runs out. Since apples contains only two items, the for loop finishes looping after two iterations.
We’ll see loops often when collecting data on the web. As we programmatically harvest data points online, we’ll put data like headlines or timestamps into a list and run functions on each one by iterating through them with lists. For example, the timestamps for any given tweet might be stored as long strings like 2019-01-22 06:58:44, so we may want to write a function to separate the date from the time when it was published. Using a loop allows us to operate that function on every single date instead of having to do the work manually for every timestamp.
Using Conditionals
Last but not least, let’s talk about logic. Loops can help us automatically go through a large amount of data and perform actions on each one, but every item is treated the same. What should our script do when we encounter an item that should not be treated the same? This is where conditionals come in.
Conditionals tell Python to run code based on whether a condition has been met. One of the most often used conditionals are if clauses, which tell Python that if a condition is true, it should do one thing. If this condition is not met, an else clause tells Python to run some other code. While if clauses can be used by themselves, an else clause must always be paired with an if clause.
We usually use conditionals with logical operators—symbols that allow us to determine whether a condition is true or false. For example, in math class you’ve probably used the greater than sign (>) to make statements. For example, the statement 5 > 9 means “five is greater than nine.” Since five isn’t actually larger than nine, the statement is false. Logical operators in Python work in a similar way, except that some of the operator’s symbols are different. For example, when you test for equality in math, you use a single equal sign (=), but because Python uses single equal signs for assignment statements, the operator to check whether two values are equal in Python is instead two equal signs (==).
Table 1-1 contains a list of operators that you can use with conditional statements.
Table 1-1: Logical Operators
| Operator | What it does | Example |
|---|---|---|
| `= | If the values to the left and right of the operator are equal, then the condition is true. | (“pie” == “cake”) is not true. |
| != | If the values to the left and right of the operator are not equal, then the condition is true. | (“pie” != “cake”) is true. |
| > | If the value to the left of the operator is greater than the value to the right, then the condition is true. | (4 > 10) is not true. |
| < | If the value to the left of the operator is less than the value to the right, then the condition is true. | (4 < 10) is true. |
| >= | If the value to the left of the operator is greater than or equal to the value to the right, then the condition is true. | (4 >= 10) is not true. |
| <= | If the value to the left of the operator is less than or equal to the value to the right, then the condition is true. | (4 <= 10) is true. |
Now that you know the basics of how if clauses and conditional statements work, let’s look at an example. We’ll tell Python to give us some pie if a food variable contains “pie” or to print something else when food isn’t equal to “pie”. First, assign the string “pie” to the variable food. Then enter the if operator followed by a condition. In this case, the condition is food == “pie”, meaning the condition is that the variable food has the value “pie”, followed by a colon :. An if clause uses indentation to signify scope, just like functions and loops do. Use the tab key to indent the line that follows your if clause. Any indented code following the colon is now considered part of what Python will execute if the condition food == “pie” is met. In this case, if food == “pie” then Python will print the string “Give me some pie!”. Then, using the operator else and a colon, we tell Python what it should do if the condition food == “pie” is not met. Again, use the tab key to write out these instructions, so Python understands that the indented code contains instructions it should execute if the initial condition is not met. In this case, we want Python to print the string “I’m not hungry”.
>>> food = "pie"

>>> if food == "pie" :

        print("Give me some pie!")

    else:

        print("I'm not hungry")

Give me some pie!
When we run this code in our interactive shell, it should print the string “Give me some pie!” because our condition (if food == “pie”) is met.
The data we’ll harvest on social media can be irregular, which might cause errors if our code isn’t written to handle idiosyncrasies. An if clause is a great way for us to build “worst-case scenarios” into our data-gathering scripts to handle these situations. Let’s say we wanted to use Python to gather the description for a list of 100 different Facebook groups. Since it’s not mandatory for administrators to write up a description for their groups, some groups may have descriptions and others may not. If you use a for loop to go through the entire list of groups, Python will look for a description for every group, even those that may not have one. This may confuse the Python script. In those cases, it can be useful to write to use conditionals to instruct Python: if the group has a description, Python should gather that information, else it should record a generic string like “This group does not have a description” in lieu of a description.
Summary
This book covers a lot of ground. While you won’t be able to become an expert in every web language—frontend or backend—this chapter hopefully has helped you understand the basic ways in which web languages function. In many ways, learning a programming language is akin to learning a spoken language: first we have to learn some of the most common words and grammar, and then we can expand our vocabulary and become more fluent. Think of the function names and HTML tags you just learned about as the vocabulary of the coding languages, and the concepts like conditionals, loops, and if clauses as the grammar. These fundamentals will help you read the scripts we write in the coming chapters, and as we move from example to example, you’ll be able to build on this foundation to become a more fluent coder.
In the next chapter, we’ll explore application programming interfaces (APIs) as a data source, and you’ll use your newfound Python knowledge to request and access data from the YouTube API.